I found an interesting web page in nVIDIA. It is the biggest advantage of OpenGL CubicVR viwer compared to QTVR or Flash player based viewers.
OpenGLについて調べていた時、nVIDIA社の中で次のようなページを見つけました。これはCubicVRと鏡面反射モデルを用いた写り込みのテクスチャーマップですね。
http://developer.nvidia.com/object/cube_map_ogl_tutorial.html
たとえば砂漠でCubicVRを撮影し、自分の好きな車のモデル作ってCubicVRの箱の中に入れれば、車の窓には砂漠の景色が見事に映り込むはずです。車を回転させれば、映り込みも変わる。これはOpenGLを使う意味がありそうです。テレビゲームではきっと既に使われているのかもしれませんね。
2009/02/19
CTRL, ALT and SHIFT
I found glut doesn't provide functionality to detect SHIFT or CTRL key is down. It's for only when some other key was pushed. Please see the web page below.
http://www.lighthouse3d.com/opengl/glut/index.php?5
先日の疑問についてですが、やはりSHIFTやCTRLキーが押されたかどうかだけを判断する機能をglutは持っていないようです。あくまでも他のキーが押された時にのみの判定だそうです。
-----------------------
CTRL, ALT and SHIFT
Sometimes we may want to know if one modifier key, i.e. CTRL, ALT or SHIFT is being pressed. GLUT provides a function that detects if any modifier is being pressed. This function should only be called inside the functions that process keyboard or mouse input events. The syntax for this function is:
int glutGetModifiers(void);
-----------------------
-------------------------------------------------
glutGetModifiers
2009/02/18
cubeGL V1.0 dirty code
The first version of CubicVR Viewer "cubeGL" is now working. It still a dirty code.
一応CubicVR Viewer "cubeGL"が動きましたので、まだ汚いコードですが、参考になればと思い掲載します。本当はもっときれいなコードにしてから掲載したかったのですが、コードをきれいにすると動かなくなります。これをもとに、一から書き直した方が早いかもしれませんね。改良点としては、
1. glutMotionFunc( )を使ってマウスでグリグリ回せるようにした。
2. glutIdleFunc()を使って、マウスを放しても慣性力で回り続けるようにした。
# cube-GL V1.0 - still dirty code, but has minimum functionality set
# A Python/Open-GL based cubic VR viewer
# By R.Kishimoto 2009.2.18
import sys
import math
import Image
import time
from OpenGL.GL import *
from OpenGL.GLU import *
from OpenGL.GLUT import *

tex_size = 256
window_size = (500, 500)
input_file_name = "./pcube/sj256.jpg"
mx=my=0
gx=gy=0
mod = 0
now = past = 0
xspeed = yspeed = 0

def prep_tex (pfname):
  global rc, image_x
  im=Image.open(pfname)
  size=im.size
  image_x = size[0]
  image_y = size[1]

  if image_x*6 == image_y:
    print "good y = 6x"
  else:
    print "error y != 6x"
    sys.exit

  rc = image_x / tex_size
  rc_mod = image_x % tex_size
  if rc_mod != 0:
    rc = rc + 1

  for face in range(6):
    for y in range(rc):
      for x in range(rc):
        x1 = tex_size*x
        x2 = x1 + tex_size
        y1 = face * image_x + tex_size * y
        y2 = y1 + tex_size

        box = (x1, y1, x2, y2)
        region = im.crop(box)
        fname = '%s%d%d%d%s' % (pfname, face, y, x, ".jpg")
        region.save(fname)
        print (face, y, x, x1, y1, x2, y2, fname)

fov = 120
vertices = ((-1.0, 1.0, -1.0), (1.0, 1.0, -1.0), (1.0, -1.0, -1.0), (-1.0, -1.0, -1.0),
            (-1.0, 1.0, 1.0), (1.0, 1.0, 1.0), (1.0, -1.0, 1.0), (-1.0, -1.0, 1.0))

def polygon(a, b, c, d):
  glBegin(GL_POLYGON)
  glTexCoord2f(0.0, 0.0)
  glVertex3fv(vertices[a])
  glTexCoord2f(1.0, 0.0)
  glVertex3fv(vertices[b])
  glTexCoord2f(1.0, 1.0)
  glVertex3fv(vertices[c])
  glTexCoord2f(0.0, 1.0)
  glVertex3fv(vertices[d])
  glEnd()

def cube():
  ti = 0
  step = 2.0 * 256.0 / 1000.0
  glEnable(GL_TEXTURE_2D)

  for y in range(rc):
    for x in range(rc):
      x1 = -1 + step * x
      x2 = x1 + step
      y1 = 1 - step * y
      y2 = y1 - step
      #print "x1,x2,y1,y2,step,ti", x1, x2, y1, y2, step, ti
      glBindTexture(GL_TEXTURE_2D, texture[ti])
      #polygon(0,1,2,3)
      glBegin(GL_POLYGON)
      glTexCoord2f(0.0, 0.0)
      glVertex3f(x1, y1, -1.0)
      glTexCoord2f(1.0, 0.0)
      glVertex3f(x2, y1, -1.0)
      glTexCoord2f(1.0, 1.0)
      glVertex3f(x2, y2, -1.0)
      glTexCoord2f(0.0, 1.0)
      glVertex3f(x1, y2, -1.0)
      glEnd()
      ti=ti+1

  for y in range(rc):
    for x in range(rc):
      x1 = -1 + step * x
      x2 = x1 + step
      y1 = 1 - step * y
      y2 = y1 - step
      #print "x1,x2,y1,y2,step,rc", x1, x2, y1, y2, step, rc
      glBindTexture(GL_TEXTURE_2D, texture[ti])
      #polygon(1,5,6,2)
      glBegin(GL_POLYGON)
      glTexCoord2f(0.0, 0.0)
      glVertex3f(1.0, y1, x1)
      glTexCoord2f(1.0, 0.0)
      glVertex3f(1.0, y1, x2)
      glTexCoord2f(1.0, 1.0)
      glVertex3f(1.0, y2, x2)
      glTexCoord2f(0.0, 1.0)
      glVertex3f(1.0, y2, x1)
      glEnd()
      ti=ti+1

  for y in range(rc):
    for x in range(rc):
      x1 = 1 - step * x
      x2 = x1 - step
      y1 = 1 - step * y
      y2 = y1 - step
      #print "x1,x2,y1,y2,step,rc", x1, x2, y1, y2, step, rc
      glBindTexture(GL_TEXTURE_2D, texture[ti])
      #polygon(5,4,7,6)
      glBegin(GL_POLYGON)
      glTexCoord2f(0.0, 0.0)
      glVertex3f(x1, y1, 1.0)
      glTexCoord2f(1.0, 0.0)
      glVertex3f(x2, y1, 1.0)
      glTexCoord2f(1.0, 1.0)
      glVertex3f(x2, y2, 1.0)
      glTexCoord2f(0.0, 1.0)
      glVertex3f(x1, y2, 1.0)
      glEnd()
      ti=ti+1

  for y in range(rc):
    for x in range(rc):
      x1 = 1 - step * x
      x2 = x1 - step
      y1 = 1 - step * y
      y2 = y1 - step
      #print "x1,x2,y1,y2,step,rc", x1, x2, y1, y2, step, rc
      glBindTexture(GL_TEXTURE_2D, texture[ti])
      #polygon(4,0,3,7)
      glBegin(GL_POLYGON)
      glTexCoord2f(0.0, 0.0)
      glVertex3f(-1.0, y1, x1)
      glTexCoord2f(1.0, 0.0)
      glVertex3f(-1.0, y1, x2)
      glTexCoord2f(1.0, 1.0)
      glVertex3f(-1.0, y2, x2)
      glTexCoord2f(0.0, 1.0)
      glVertex3f(-1.0, y2, x1)
      glEnd()
      ti=ti+1

  for y in range(rc):
    for x in range(rc):
      x1 = -1 + step * x
      x2 = x1 + step
      y1 = 1 - step * y
      y2 = y1 - step
      #print "x1,x2,y1,y2,step,rc", x1, x2, y1, y2, step, rc
      glBindTexture(GL_TEXTURE_2D, texture[ti])
      #polygon(4,5,1,0)
      glBegin(GL_POLYGON)
      glTexCoord2f(0.0, 0.0)
      glVertex3f(x1, 1.0, y1)
      glTexCoord2f(1.0, 0.0)
      glVertex3f(x2, 1.0, y1)
      glTexCoord2f(1.0, 1.0)
      glVertex3f(x2, 1.0, y2)
      glTexCoord2f(0.0, 1.0)
      glVertex3f(x1, 1.0, y2)
      glEnd()
      ti=ti+1

  for y in range(rc):
    for x in range(rc):
      x1 = -1 + step * x
      x2 = x1 + step
      y1 = -1 + step * y
      y2 = y1 + step
      #print "x1,x2,y1,y2,step,rc", x1, x2, y1, y2, step, rc
      glBindTexture(GL_TEXTURE_2D, texture[ti])
      #polygon(3,2,6,7)
      glBegin(GL_POLYGON)
      glTexCoord2f(0.0, 0.0)
      glVertex3f(x1, -1.0, y1)
      glTexCoord2f(1.0, 0.0)
      glVertex3f(x2, -1.0, y1)
      glTexCoord2f(1.0, 1.0)
      glVertex3f(x2, -1.0, y2)
      glTexCoord2f(0.0, 1.0)
      glVertex3f(x1, -1.0, y2)
      glEnd()
      ti=ti+1

def drawText( value, x,y,  windowHeight, windowWidth, step = 18 ):
  """Draw the given text at given 2D position in window
  """
  glMatrixMode(GL_PROJECTION);
  # For some reason the GL_PROJECTION_MATRIX is overflowing with a single push!
  # glPushMatrix()
  matrix = glGetDouble( GL_PROJECTION_MATRIX )

  glLoadIdentity();
  glOrtho(0.0, windowHeight or 32, 0.0, windowWidth or 32, -1.0, 1.0)
  glMatrixMode(GL_MODELVIEW);
  glPushMatrix();
  glLoadIdentity();

  glClearColor(1.0, 1.0, 1.0, 0.0)

  glBegin(GL_LINES)
  glColor3f(1.0, 1.0, 1.0)
  glVertex2i(x, y+20)
  glVertex2i(x+60, y+20)
  glVertex2i(x+60, y)
  glVertex2i(x+60, y+20)
  glVertex2i(x, y)
  glVertex2i(x, y+20)
  glEnd()

  glRasterPos2i(x, y);
  lines = 0
  for character in value:
    if character == '\n':
      glRasterPos2i(x, y-(lines*18))
    else:
      glutBitmapCharacter(GLUT_BITMAP_HELVETICA_18, ord(character));
  glPopMatrix();
  glMatrixMode(GL_PROJECTION);
  # For some reason the GL_PROJECTION_MATRIX is overflowing with a single push!
  # glPopMatrix();
  glLoadMatrixd( matrix ) # should have un-decorated alias for this...

  glMatrixMode(GL_MODELVIEW);

def display():
  glClear(GL_COLOR_BUFFER_BIT | GL_DEPTH_BUFFER_BIT)
  glViewport(0, 0, window_size[0], window_size[1])

  glMatrixMode(GL_PROJECTION)
  glLoadIdentity()

  # set camera FOV=100 degree, aspect=1.0, near=0.01(0.0 will cause error), far=100.0
  gluPerspective(fov, 1.0, 0.01, 100.0)

  glMatrixMode(GL_MODELVIEW)
  glLoadIdentity()
  # eye, at, up
  gluLookAt(0.0, 0.0, 0.0, xxx, yyy, zzz, 0, 1, 0)

  cube()

  drawText( 'ksmt', 430, 1, window_size[0], window_size[1] )
  drawText( 'Z-OUT', 360, 1, window_size[0], window_size[1] )
  drawText( 'Z-IN', 290, 1, window_size[0], window_size[1] )
  drawText( 'DOWN', 220, 1, window_size[0], window_size[1] )
  drawText( 'UP', 150, 1, window_size[0], window_size[1] )
  drawText( '-->', 80, 1, window_size[0], window_size[1] )
  drawText( '<--', 10, 1, window_size[0], window_size[1] )

  glFlush()

def deg2rad(deg):
  rad = math.pi * deg / 360
  return rad

uuu = 10.0
fov = 120
xzd = -180
xyd = 0
xzt = deg2rad(xzd)
xyt = deg2rad(xyd)

yyy = math.sin(xyt)
zzz = math.sin(xzt) * math.cos(xyt)
xxx = math.cos(xzt) * math.cos(xyt)

def mykey(key, x, y):
  global xxx, yyy, zzz, fov, xzd, xyd
  print "key, mod ", key, glutGetModifiers()

  if key=='a': # -xzt
    xzd = xzd - uuu
  elif key=='d': # +xzt
    xzd = xzd + uuu
  elif key=='x': # -xyt
    if (xyd - uuu) >= -180 :
      xyd = xyd - uuu
  elif key=='w': # +xyt
    if (xyd + uuu) <= 180:
      xyd = xyd + uuu
  elif key=='s': # default
    xzd = -180.0
    xyd = 0.0
    fov = 120

  elif key=='e': # zoom out
    if fov <= 160:
      fov = fov + 10
  elif key=='z': # zoom in
    if fov > 10:
      fov = fov - 10

  elif key=='-': # zoom out
    if fov <= 160:
      fov = fov + 10
  elif key=='+': # zoom in
    if fov >=10:
      fov = fov - 10

  xzt = deg2rad(xzd)
  xyt = deg2rad(xyd)

  yyy = math.sin(xyt)
  zzz = math.sin(xzt) * math.cos(xyt)
  xxx = math.cos(xzt) * math.cos(xyt)

  glutPostRedisplay()

def mymouse(button, state, x, y):
  global xxx, yyy, zzz, fov, xzd, xyd, start_x, start_y, gx, gy, mod
  sy = window_size[1] - y
  mod = glutGetModifiers()
  #print "click button, state, x, y, mod--------", button, state, x , sy, mod
  if state == 0 & button == 0:
    start_x = x
    start_y = sy
    if ((10 < x) & (x < 70) & (sy < 20)):
      xzd = xzd - uuu
      print "left ", x, sy
    elif ((80 < x) & (x < 140) & (sy < 20)):
      xzd = xzd + uuu
      print "right ", x, sy
    elif ((150 < x) & (x < 210) & (sy < 20)):
      if (xyd - uuu) >= -180 :
        xyd = xyd + uuu
        print "up ", x, sy
    elif ((220 < x) & (x < 280) & (sy < 20)):
      if (xyd + uuu) <= 180:
        xyd = xyd - uuu
        print "down ", x, sy
    elif ((290 < x) & (x < 350) & (sy < 20)):
      if fov <= 160:
        fov = fov - 10
        print "out ", x, sy
    elif ((360 < x) & (x < 420) & (sy < 20)):
      if fov > 10:
        fov = fov + 10
        print "in ", x, sy

  gx = x
  gy = sy

  xzt = deg2rad(xzd)
  xyt = deg2rad(xyd)

  yyy = math.sin(xyt)
  zzz = math.sin(xzt) * math.cos(xyt)
  xxx = math.cos(xzt) * math.cos(xyt)

  prev_state = state

  glutPostRedisplay()


def gentex(t, img):
  # use the given texture
  glBindTexture(GL_TEXTURE_2D, t)

  # read texture data from .bmp file using Image library
  image=Image.open(img)
  if len(image.getbands())!=4:
    image=image.convert("RGBA")
  size=image.size

  # generate texture from array image.tostring() inside current texture 'texture'
  glTexImage2D(GL_TEXTURE_2D, 0, GL_RGBA, size[0], size[1], 0, GL_RGBA, GL_UNSIGNED_BYTE, image.tostring())

  glTexParameterf(GL_TEXTURE_2D, GL_TEXTURE_MAG_FILTER, GL_NEAREST)
  glTexParameterf(GL_TEXTURE_2D, GL_TEXTURE_MIN_FILTER, GL_NEAREST)

def mymotion(x, y):
  global xxx, yyy, zzz, fov, xzd, xyd, start_x, start_y, gx, gy, mod, now, past, xspeed, yspeed
  y = window_size[1]-y
  #print "motion xy, frist_flag, gx, gy, mod", x, y, gx, gy, mod

  dx = x - gx
  dy = y - gy
  xzd = xzd + dx
  if ((xyd + dy) >= -180) & ((xyd + dy) <= 180):
    xyd = xyd + dy

  now = time.time()
  dtime = now - past
  if dtime == 0:
    xspeed = yspeed = 0
  else:
    xspeed = 0.9 * dx / dtime
    yspeed = 0.9 * dy / dtime

  speedlimit = 200.0
  if xspeed > speedlimit :
    xspeed = speedlimit
  elif xspeed < ( -1 * speedlimit) :
    xspeed = -1 * speedlimit

  if yspeed > speedlimit:
    yspeed = speedlimit
  elif yspeed < (-1 * speedlimit) :
    yspeed = -1 * speedlimit

  #print "xspeed, yspeed", xspeed, yspeed
  past = now

  if mod==GLUT_ACTIVE_SHIFT: # zoom in
    if fov > 10:
      fov = fov - 1
  elif mod==GLUT_ACTIVE_CTRL: # zoom out
    if fov <= 160:
      fov = fov + 1

  xzt = deg2rad(xzd)
  xyt = deg2rad(xyd)

  yyy = math.sin(xyt)
  zzz = math.sin(xzt) * math.cos(xyt)
  xxx = math.cos(xzt) * math.cos(xyt)

  glutPostRedisplay()
  gx = x
  gy = y

def myidle():
  global now, past, xspeed, yspeed, xxx, yyy, zzz, fov, xzd, xyd
  now = time.time()
  dtime = now - past

  dy = dtime * yspeed
  if ((xyd + dy) >= -180) & ((xyd + dy) <= 180):
    xyd = xyd + dy
  xzd = xzd + (dtime * xspeed)

  xzt = deg2rad(xzd)
  xyt = deg2rad(xyd)

  yyy = math.sin(xyt)
  zzz = math.sin(xzt) * math.cos(xyt)
  xxx = math.cos(xzt) * math.cos(xyt)

  glutPostRedisplay()
  past = now
  xspeed = xspeed * 0.99
  yspeed = yspeed * 0.99

def myspecial( key, x, y ):
  mod = glutGetModifiers()
  print "special key, x, y, mod ", key, x, y, mod

glutInit( sys.argv )
#glutInitDisplayMode( GLUT_RGBA | GLUT_DOUBLE | GLUT_DEPTH )
glutInitDisplayMode( GLUT_RGBA | GLUT_SINGLE | GLUT_DEPTH )
glutInitWindowSize( window_size[0], window_size[1] )
glutInitWindowPosition(0,0)
glutCreateWindow( 'cube' )
glutDisplayFunc( display )
glutKeyboardFunc( mykey )
glutMouseFunc( mymouse )
glutMotionFunc( mymotion)
glutSpecialFunc( myspecial )
glutIdleFunc( myidle )
glEnable(GL_DEPTH_TEST)
#glEnable(GL_CULL_FACE)
#glCullFace(GL_BACK)
# prep_tex(input_file_name)

### TEXTURE
rc=4
tex_num=0
glEnable(GL_TEXTURE_2D)
texture=glGenTextures(rc*rc*6)
for face in range(6):
  for y in range(rc):
    for x in range(rc):
      fname = '%s%d%d%d%s' % ("./pcube/sjtex", face, y, x, ".jpg")
      gentex(texture[tex_num], fname)
      #print 'reading texture %s %d' % (fname, tex_num)
      tex_num = tex_num+1

#Menu
def selectMessage():
  return 1
  print "select message meny selected"

glutMainLoop()

#
# Six Cubic face global mapping
# 0-----1
# |     |
# |  F0 |
# 3-----2
# 1-----5
# |     |
# |  R1 |
# 2-----6
# 5-----4
# |     |
# |  B2 |
# 6-----7
# 4-----0
# |     |
# |  L3 |
# 7-----3
# 4-----5
# |     |
# |  U4 |
# 0-----1
# 3-----2
# |     |
# |  D5 |
# 7-----6
#
#        4-----5
#        |     |
#        |  U4 |
#        0-----1
# 4-----00-----11-----55-----4
# |     ||     ||     ||     |
# |  L3 ||  F0 ||  R1 ||  B2 |
# 7-----33-----22-----66-----7
#        3-----2
#        |     |
#        |  D5 |
#        7-----6
#
# local texture mapping
#
# 0.0----------------------------1.0
# |-----------image_x--------------|
# |--tex_size--|
# |<-- (tex_size/image_x) * 0
#              |<-- (tex_size/image_x) * 1
#                           |<-- (tex_size/image_x) * 2
-------------------------------------------------
CubicVR Viewer,
glutIdleFunc(),
QTVR
cannot detect SHIFT key status while doing anything else
Other CubicVR viewers use SHIFT ket for zoom in and CTRL key for zoom out. However, I cannto find any ways to do this in OpenGL. If I push some other key or mouse button while pushing down SHIFT key, I can detect it by useing glutGetModifiers(). But, if I just push SHIFT key, no event detected by OpenGL even in glutIdleFunc(). glutSpecialFunc() doesn't detect SHIFT key. I found some people are asking the same question in web, but I couldn't find any good answere yet. If you know how I can detect SHIFT key event, please let me know.
普通のCubicVR Viewerでは、シフトキーを押すとズームイン、コントロールキーを押すとズームアウトなのですが、OpenGLでうまく実装できていません。シフトキーを押しながら何かすれば(他のキーを押す、マウスボタンを押す)glutGetModifiersでshift, ctrl, altキーが同時に押されたことが分かるのですが、ただシフトキーが押されただけという状態を検出できないのです。シフトキーを押しながらマウスを動かしても、ボタンを押さない限り検出できません。glutSpecialFunc()もシフトキーは認識しません。Webで探しても、同じ質問をしている人は何人か見つかるのですが、誰も回答をもらっていないようです。ご存じの方がおられたら、教えて下さい。
glutKeyboardFunc( mykey ) --- can detect shift key down stat
glutMouseFunc( mymouse ) --- can detect shift key down stat
glutMotionFunc( mymotion) --- can NOT detect
glutSpecialFunc( myspecial ) --- can
glutIdleFunc( myidle ) --- can NOT
まあ、とりあえず、マウスを押したときにシフトキーを押していれば、パンと一緒にズームインするようにしました。まあ、これでも使用上は問題ありませんが、他のソフトとの共通性の問題が残ります。
-------------------------------------------------
glutGetModifiers,
glutIdleFunc,
glutSpecialFunc
glutMotionFunc
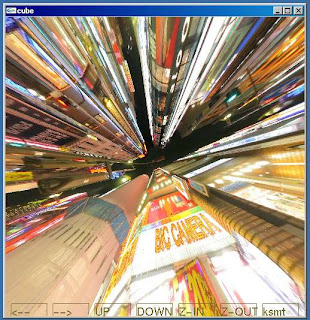 By using glutMotionFunc, I can smoothly move camera direction, panning camera. Please refer the following sample code. Since glutMotionFunc is activated only after the first move of mouse, glutMouseFunc( mymouse ) shold be used to get the point you clicked the mouse button.
glutMotionFuncを使って、マウスのボタンを押しながらマウスを動かすことによって、スムースにカメラの方向を変えられるようになりました。OpenGLの入門書を読んでも今ひとつはっきりしないのですが、下のようにやれば簡単です。glutMotionFuncはマウスを動かした後の座標しかレポートしませんので、マウスボタンを押した時の座標はglutMouseFunc( mymouse ) から取得しなければなりません。
gx=gy=0
def mymouse(button, state, x, y):
global gx, gy
y = window_size[1] - y
gx = x
gy = y
def mymotion(x, y):
global gx, gy
y = window_size[1] - y
dx = x - gx
dy = y - gy
# calculation of global vars used in glutDisplayFunc( display )
glutPostRedisplay()
gx = x
gy = y
glutDisplayFunc( display )
glutMouseFunc( mymouse )
glutMotionFunc( mymotion)
-------------------------------------------------
glutMotionFunc
2009/02/17
Text display for menu button
I couldn't add bitmap text for my menu button on Python/OpenGL. By some reason, I cannot use glutBitmapCharacter(). I couldn't find any information on Web. Finally, I found an example at,
Python25\Lib\site-packages\OpenGL\tests\test_glutwindow.py
Now, I can add some text, but I still cannot specify text color yet.
OpenGL/Pythonでメニューボタンを作ろうと思ったのですが、どうしてもうまくテキストが表示できません。教科書には次のように書いてあるのですが。
glWindowPos*()
glutBitmapCharacter( GLUT_BITMAP_8_BY_13, 'a')
これはPythonではエラーになってしまいます。
どうやらPythonでは、
glutBitmapCharacter( GLUT_BITMAP_8_BY_13, ord('a'))
らしいのですが、これもうまくいきません。
Webを見ても回答を得られません。これは困った。しょうがないので、PythonのOpenGLのライブラリの中にヒントがないかと探してみたところ、ありました。
Python25\Lib\site-packages\OpenGL\tests\test_glutwindow.py
です。これを見ると、
と書いてあります。これをそのままコピーして使うと、やっと文字が書けるようになったのでした。しかし、まだ文字の色が自由に決められないので完全ではありません。まあ、でも、これでOpenGLでメニューボタンを作るめどがたちました。
Python25\Lib\site-packages\OpenGL\tests\test_glutwindow.py
Now, I can add some text, but I still cannot specify text color yet.
OpenGL/Pythonでメニューボタンを作ろうと思ったのですが、どうしてもうまくテキストが表示できません。教科書には次のように書いてあるのですが。
glWindowPos*()
glutBitmapCharacter( GLUT_BITMAP_8_BY_13, 'a')
これはPythonではエラーになってしまいます。
どうやらPythonでは、
glutBitmapCharacter( GLUT_BITMAP_8_BY_13, ord('a'))
らしいのですが、これもうまくいきません。
Webを見ても回答を得られません。これは困った。しょうがないので、PythonのOpenGLのライブラリの中にヒントがないかと探してみたところ、ありました。
Python25\Lib\site-packages\OpenGL\tests\test_glutwindow.py
です。これを見ると、
def drawText( value, x,y,  windowHeight, windowWidth, step = 18 ):
"""Draw the given text at given 2D position in window
"""
glMatrixMode(GL_PROJECTION);
# For some reason the GL_PROJECTION_MATRIX is overflowing with a single push!
# glPushMatrix()
matrix = glGetDouble( GL_PROJECTION_MATRIX )

glLoadIdentity();
glOrtho(0.0, windowHeight or 32, 0.0, windowWidth or 32, -1.0, 1.0)
glMatrixMode(GL_MODELVIEW);
glPushMatrix();
glLoadIdentity();
glRasterPos2i(x, y);
lines = 0
for character in value:
if character == '\n':
 glRasterPos2i(x, y-(lines*18))
else:
 glutBitmapCharacter(GLUT_BITMAP_HELVETICA_18, ord(character));
glPopMatrix();
glMatrixMode(GL_PROJECTION);
# For some reason the GL_PROJECTION_MATRIX is overflowing with a single push!
# glPopMatrix();
glLoadMatrixd( matrix ) # should have un-decorated alias for this...

glMatrixMode(GL_MODELVIEW);

drawText( 'hello', 20,20, size[0],size[1] )
#glutBitmapCharacter( GLUT_BITMAP_8_BY_13, ord('a'))
と書いてあります。これをそのままコピーして使うと、やっと文字が書けるようになったのでした。しかし、まだ文字の色が自由に決められないので完全ではありません。まあ、でも、これでOpenGLでメニューボタンを作るめどがたちました。
-------------------------------------------------
glutBitmapCharacter
PIL (Python Image Library)による画像分割
For OpenGL texture mapping, only limited size picture can be accepted such as 128x128, and 256x256. I should cut large picture (such as 1500 x 9000) into smaller pieces such as 256 x 256
for OpenGL texture mapping. In Python, I can use PIL to do this. I included PIL sample and OpenGL sample to read the small jpeg files.
OpenGLのテクスチャーは128とか256とか512という2の累乗のサイズの画像しか受け付けません。CubicVRでは普通3000 x 3000ピクセルとかの画像を上下左右前後6枚使います。(私の使う画像は6枚が縦に繋がっています) jpegで保存された大きな画像をPythonで読みだして、複数の256x256の小さな画像に切り分け、またjpegで書き出すプログラムをPIL (Python Image Library)で作ってみました。これで、いくら大きな画像でもPython/OpenGLのCubicVR Viewerに読み込むことができます。ついでにOpenGLに読み込む時のPythonのサンプルもつけます。
#6枚の正方形画像が縦につながった大きな画像をtex_size x tex_sizeの小さな画像に分割して, jpegで保存
def prep_tex (pfname):
global rc, image_x
im=Image.open(pfname)
size=im.size
image_x = size[0]
image_y = size[1]

if image_x*6 == image_y:
  print "good y = 6x"
else:
  print "error y != 6x"
  sys.exit

rc = image_x / tex_size
rc_mod = image_x % tex_size
if rc_mod != 0:
  rc = rc + 1

for face in range(6):
  for y in range(rc):
    for x in range(rc):
      x1 = tex_size*x
      x2 = x1 + tex_size
      y1 = face * image_x + tex_size * y
      y2 = y1 + tex_size

      box = (x1, y1, x2, y2)
      region = im.crop(box)
      fname = '%s%d%d%d%s' % (pfname, face, y, x, ".jpg")
      region.save(fname)
      print (face, y, x, x1, y1, x2, y2, fname)

# 分割されたjpegファイルを読みだして、OpenGLのTextureに変換
tex_num=0
glEnable(GL_TEXTURE_2D)
texture=glGenTextures(rc*rc*6)
for face in range(6):
for y in range(rc):
  for x in range(rc):
    fname = '%s%d%d%d%s' % ("./pcube/sjtex", face, y, x, ".jpg")
    gentex(texture[tex_num], fname)
    #print 'reading texture %s %d' % (fname, tex_num)
    tex_num = tex_num+1
-------------------------------------------------
Python Image Library,
Texture Mapping
2008/06/09
 The result of 360 degree cubic panorama player looks like this. Type keys to rotate/zoom the panorama image.
"s" home position
"a" rotate left
"d" rotate right
"w" rotate up
"x" rotate down
"-" zoom in
"+" zoom out
実行するとこんな感じで表示されます。キーボードを使って回転させます。
I should do the following thins to fix issues or enhance usability. 次のような点を改善しなければなりません。
1. Rotate -90 degree of the initial image
2. Use mouse rather than keyboard
3. Fix bugs of rotation
4. Limit the FOV not to show black portion
-------------------------------------------------
QTVR,
Texture Mapping
QTVR functionality usign OpenGL (1)
To display 360 degree cubic panorama movie, either QuickTime(QTVR) or Adobe Flash player is used as viewer. I like QTVR very much and I participate "World Wide Panorama" ten times, http://geoimages.berkeley.edu/worldwidepanorama/wwppeople/html/RikuichiKishimoto.html
360度キュービックVRの表示には通常QuickTime(QTVR)またはAdobe Flash Playerが使われます。私はQTVRの製作が趣味でして、World Wide Panoramaにも参加しています。
It would be very easy to implement 360 degree cubic panorama viewer using OpenGL. The source image has 6 cubic faces in one JPEG file.
OpenGLでキュービックパノラマを実現することは、割と簡単だと思われますので、やってみました。普通は次のような6面の画像を繋げたJPEGの画像を使いますが、簡単化のため6枚の別々の写真に分けました。
 I manually cut the image into 6 pieces to simplify the OpenGL program.


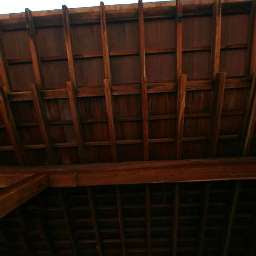 Convert six JPEG files into six texture and attach to six cubic faces. It's very straight foward. The following code still have some bugs, but I can show you the basic idea. It's really a "inside rotating cube". まだバグなどがありますが、アイデアとしては次のようなものになります。
360度キュービックVRの表示には通常QuickTime(QTVR)またはAdobe Flash Playerが使われます。私はQTVRの製作が趣味でして、World Wide Panoramaにも参加しています。
It would be very easy to implement 360 degree cubic panorama viewer using OpenGL. The source image has 6 cubic faces in one JPEG file.
OpenGLでキュービックパノラマを実現することは、割と簡単だと思われますので、やってみました。普通は次のような6面の画像を繋げたJPEGの画像を使いますが、簡単化のため6枚の別々の写真に分けました。
 I manually cut the image into 6 pieces to simplify the OpenGL program.


 Convert six JPEG files into six texture and attach to six cubic faces. It's very straight foward. The following code still have some bugs, but I can show you the basic idea. It's really a "inside rotating cube". まだバグなどがありますが、アイデアとしては次のようなものになります。
import sys
import math
import Image
from OpenGL.GL import *
from OpenGL.GLU import *
from OpenGL.GLUT import *

vertices = ((-1.0, -1.0, 1.0), (-1.0, 1.0, 1.0), (1.0, 1.0, 1.0), (1.0, -1.0, 1.0),
            (-1.0, -1.0, -1.0), (-1.0, 1.0, -1.0), (1.0, 1.0, -1.0), (1.0, -1.0, -1.0))
uuu = 0.1
fov = 120
xzt = yzt = 0
yyy = math.sin(yzt)
r = math.cos(yzt)
zzz = r * math.sin(xzt)
xxx = r * math.cos(xzt)

def polygon(a, b, c, d):
  glBegin(GL_POLYGON)
  glTexCoord2f(0.0, 0.0)
  glVertex3fv(vertices[a])
  glTexCoord2f(0.0, 1.0)
  glVertex3fv(vertices[b])
  glTexCoord2f(1.0, 1.0)
  glVertex3fv(vertices[c])
  glTexCoord2f(1.0, 0.0)
  glVertex3fv(vertices[d])
  glEnd()

def cube():
  global texture
  glEnable(GL_TEXTURE_2D)
  glBindTexture(GL_TEXTURE_2D, texture[4])
  polygon(4,5,6,7)
  glBindTexture(GL_TEXTURE_2D, texture[1])
  polygon(1,5,4,0)
  glBindTexture(GL_TEXTURE_2D, texture[2])
  polygon(3,7,6,2)
  glBindTexture(GL_TEXTURE_2D, texture[0])
  polygon(0,4,7,3)
  glBindTexture(GL_TEXTURE_2D, texture[5])
  polygon(1,0,3,2)
  glBindTexture(GL_TEXTURE_2D, texture[3])
  polygon(2,6,5,1)

def display():
  glClear(GL_COLOR_BUFFER_BIT | GL_DEPTH_BUFFER_BIT)

  glMatrixMode(GL_PROJECTION)
  glLoadIdentity()

  # set camera FOV=100 degree, aspect=1.0, near=1.0(0.0 will cause error), far=100.9
  gluPerspective(fov, 1.0, 0.5, 100.0)

  glMatrixMode(GL_MODELVIEW)
  glLoadIdentity()
  # eye, at, up
  gluLookAt(0.0, 0.0, 0.0,  xxx,yyy,zzz, 0,1,0)

  cube()
  glFlush()

def mykey(key, x, y):
  global xxx, yyy, zzz, fov, xzt, yzt
  if key=='a': # -xzt
    xzt = xzt - uuu
  elif key=='d': # +xzt
    xzt = xzt + uuu
  elif key=='x': # -yzt
    yzt = yzt - uuu
  elif key=='w': # +yzt
    yzt = yzt + uuu
  elif key=='s': # default
    xzt = yzt = 0.0

  elif key=='-': # zoom out
    fov = fov - 10
  elif key=='+': # default
    fov = fov + 10

  yyy = math.sin(yzt)
  rrr = math.cos(yzt)
  zzz = rrr * math.sin(xzt)
  xxx = rrr * math.cos(xzt)

  print "xyzf:", xxx, yyy, zzz, fov
  glutPostRedisplay()

def gentex(t, img):
  # use the given texture
  glBindTexture(GL_TEXTURE_2D, t)
  print "texture", t

  # read texture data from .bmp file using Image library
  image=Image.open(img)
  if len(image.getbands())!=4:
    image=image.convert("RGBA")
  size=image.size

  # generate texture from array image.tostring() inside current texture 'texture'
  glTexImage2D(GL_TEXTURE_2D, 0, GL_RGBA, size[0], size[1], 0, GL_RGBA, GL_UNSIGNED_BYTE, image.tostring())

  glTexParameterf(GL_TEXTURE_2D, GL_TEXTURE_MAG_FILTER, GL_NEAREST)
  glTexParameterf(GL_TEXTURE_2D, GL_TEXTURE_MIN_FILTER, GL_NEAREST)

glutInit( sys.argv )
#glutInitDisplayMode( GLUT_RGBA | GLUT_DOUBLE | GLUT_DEPTH )
glutInitDisplayMode( GLUT_RGBA | GLUT_SINGLE | GLUT_DEPTH )
glutInitWindowSize( 500, 500 )
glutInitWindowPosition(0,0)
glutCreateWindow( 'cube' )
glutDisplayFunc( display )
glutKeyboardFunc(mykey)

glEnable(GL_DEPTH_TEST) #hidden-surface removal
# glEnable(GL_CULL_FACE) #don't draw back side surface
# glCullFace(GL_BACK) #don't draw back side surface

### TEXTURE
glEnable(GL_TEXTURE_2D)

# generate continuous two texture
# different format from C, void glGenTexture(n, *name)
texture=glGenTextures(6)

gentex(texture[0], "./pcube/r1.bmp")
gentex(texture[1], "./pcube/r2.bmp")
gentex(texture[2], "./pcube/r3.bmp")
gentex(texture[3], "./pcube/r4.bmp")
gentex(texture[4], "./pcube/rb.bmp")
gentex(texture[5], "./pcube/rt.bmp")

glutMainLoop()
-------------------------------------------------
QTVR,
Texture Mapping
2008/05/12
Multiple Texture
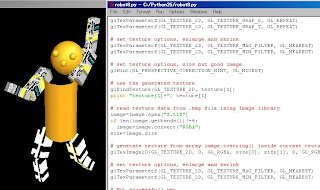 テクスチャーを2種類使ったサンプルです。どうやら次のような手順で2種類のテクスチャーを使うようです。
Sample procedure for using two texture.
#設定:一度やればいいようです。
#Setting parameters - you shoud do this only once
glEnable(GL_TEXTURE_2D)
glEnable(GL_TEXTURE_GEN_S)
glEnable(GL_TEXTURE_GEN_T)
glTexGeni(GL_S, GL_TEXTURE_GEN_MODE, GL_OBJECT_LINEAR)
glTexGeni(GL_T, GL_TEXTURE_GEN_MODE, GL_OBJECT_LINEAR)
glTexParameterf(GL_TEXTURE_2D, GL_TEXTURE_WRAP_S, GL_REPEAT)
glTexParameterf(GL_TEXTURE_2D, GL_TEXTURE_WRAP_T, GL_REPEAT)
#テクスチャーの空き番号を必要個数取得します。
# get multiple available texture ID
texture=glGenTextures(2)
#ひとつ目のテクスチャーに設定
# set the first texture as current texture
glBindTexture(GL_TEXTURE_2D, texture[0])
# 画像ファイルから数列にテクスチャデータを読み込みます
# read data from graphic file and store data in image.tostring()
image=Image.open("ksmt.bmp")
if len(image.getbands())!=4:
image=image.convert("RGBA")
size=image.size
# image.tostring()という数列のデータを使ってテクスチャーを作ります
# generate texture from image.tostring()
glTexImage2D(GL_TEXTURE_2D, 0, GL_RGBA, size[0], size[1], 0, GL_RGBA, GL_UNSIGNED_BYTE, image.tostring())
# 意味不明ですが、glTexImage2Dの後に次の2行がないとうまくテクスチャ ができません。
# I don't know why I should do this every time after glTexImage2D, but I must do this anyway.
glTexParameterf(GL_TEXTURE_2D, GL_TEXTURE_MAG_FILTER, GL_NEAREST)
glTexParameterf(GL_TEXTURE_2D, GL_TEXTURE_MIN_FILTER, GL_NEAREST)
# 二つ目のテクスチャに設定します。
# set the second texture as current texture
glBindTexture(GL_TEXTURE_2D, texture[1])
# ファイル(この場合TIF)から数列に画像データを読み込みます
# read data from the second file to memory
image=Image.open("f.tif")
if len(image.getbands())!=4:
image=image.convert("RGBA")
size=image.size
# 数列からテクスチャを作ります
# generate the second texture from memory
glTexImage2D(GL_TEXTURE_2D, 0, GL_RGBA, size[0], size[1], 0, GL_RGBA, GL_UNSIGNED_BYTE, image.tostring())
# 再びこの2行が必要です。どうやらテクスチャごとに必要のようです。
# I must do this again. I don't know the reason. This looks like a paramater setting.
glTexParameterf(GL_TEXTURE_2D, GL_TEXTURE_MAG_FILTER, GL_NEAREST)
glTexParameterf(GL_TEXTURE_2D, GL_TEXTURE_MIN_FILTER, GL_NEAREST)
#Display Funcの中でテクスチャを指定します。
#inside Display function
glDisable(GL_TEXTURE_2D) #テクスチャ不要の場合 no texture
#図形描画 #テクスチャなし図形 instanciate object with no texture
glEnable(GL_TEXTURE_2D) #テクスチャ貼り付け enable texture mapping
glBindTexture(GL_TEXTURE_2D, texture[0]) #ひとつ目のテクスチャを使う use the first texture
# 図形描画 #ひとつ目のテクスチャ instance object with the first texture
glBindTexture(GL_TEXTURE_2D, texture[0]) #ふたつ目のテクスチャを使う secont texture
#図形描画 #ふたつ目のテクスチャ instance object with the second texture
-------------------------------------------------
Texture Mapping
GL_EYE_LINEAR
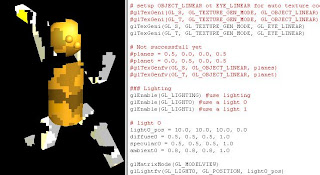 テクスチャー座標自動生成には2つのオプションがあります。GL_EYE_LINEARをセットすると、テクスチャーの位置がカメラに固定されます。図形が動くと模様が変わります。例えば、スライド上映中にスクリーンの前を横切った人のようなものです。あるいは、通り過ぎる鏡面仕上げの車に映るあなたの姿のようなものです。ただあまり大きなテクスチャーは大きな負荷になるそうですので、用途は限られそうです。
glTexGeni(GL_S, GL_TEXTURE_GEN_MODE, GL_EYE_LINEAR)
glTexGeni(GL_T, GL_TEXTURE_GEN_MODE, GL_EYE_LINEAR)
一方、GL_OBJECT_LINEARを指定すると、図形と一緒に模様が動きます。テクスチャー柄の洋服を着た人が動き回るようなものです。これは普通にテクスチャですね。
glTexGeni(GL_S, GL_TEXTURE_GEN_MODE, GL_OBJECT_LINEAR)
glTexGeni(GL_T, GL_TEXTURE_GEN_MODE, GL_OBJECT_LINEAR)
Automatic texture coordinate generation has two options. GL_EYE_LINEAR fixes relative position of texture and camera. This is something like you walk across a projection screen during slide show.
glTexGeni(GL_S, GL_TEXTURE_GEN_MODE, GL_EYE_LINEAR)
glTexGeni(GL_T, GL_TEXTURE_GEN_MODE, GL_EYE_LINEAR)
GL_OBJECT_LINEAR fixed texture potition to the object. When object moves, texture moves as a skin of the object.
glTexGeni(GL_S, GL_TEXTURE_GEN_MODE, GL_OBJECT_LINEAR)
glTexGeni(GL_T, GL_TEXTURE_GEN_MODE, GL_OBJECT_LINEAR)
現時点でのソースコード:
import sys
import math
import Image
from OpenGL.GL import *
from OpenGL.GLU import *
from OpenGL.GLUT import *

TORSO_RADIUS=0.1
TORSO_HEIGHT=0.4

HEAD_RADIUS = 0.1

UPPER_ARM_HEIGHT=0.2
UPPER_ARM_WIDTH=0.07

LOWER_ARM_HEIGHT=0.2
LOWER_ARM_WIDTH=0.05

UPPER_LEG_HEIGHT=0.2
UPPER_LEG_WIDTH=0.08

LOWER_LEG_HEIGHT=0.2
LOWER_LEG_WIDTH=0.06

SHOLDER_WIDTH = 0.2
HIP_WIDTH = 0.2

HEADX=0.1
HEADY=TORSO_HEIGHT

LUAX=-1.0 * SHOLDER_WIDTH / 2
RUAX=SHOLDER_WIDTH / 2
LUAY=RUAY=TORSO_HEIGHT
LLAY=RLAY=LOWER_ARM_HEIGHT

LULX=-1.0 * HIP_WIDTH / 2
RULX=HIP_WIDTH / 2
LULY=RULY=0
LLLY=RLLY=LOWER_LEG_HEIGHT

t0=0.0
t1=0.0
t2=0.0
t3=90.0
t4=0.0
t5=90.0
t6=0.0
t7=180.0
t8=0.0
t9=180.0
t10=0.0

def display():
  glClear(GL_COLOR_BUFFER_BIT | GL_DEPTH_BUFFER_BIT)

  glMatrixMode(GL_PROJECTION)
  glLoadIdentity()

  # set camera FOV=20 degree, aspect=1.0, near=1.0(0.0 will cause error), far=100.9
  gluPerspective(20, 1.0, 1.0, 100.0)

  glMatrixMode(GL_MODELVIEW)
  glLoadIdentity()
  # Place camera at (2,2,2), to direction (0, 0.2, 0), rotation around Z axis 0 degree(up Y)
  gluLookAt(2.0, 2.0, 2.0, 0.0, 0.2, 0.0, 0.0, 1.0, 0.0)

  #TORSO
  #glDisable(GL_TEXTURE_2D)
  gray()
  materials(brass_amb, brass_diff, brass_spec, brass_shin)
  glRotatef(t0, 0.0, 1.0, 0.0)
  torso()
  glPushMatrix()

  #HEAD
  cyan()
  glTranslatef(0.0, HEADX, 0.0)
  glRotatef(t1, 1.0, 0.0, 0.0)
  glRotatef(t2, 0.0, 1.0, 0.0)
  glTranslatef(0.0, HEADY, 0.0)
  head()

  #nose
  yellow()
  glTranslatef(0.0, 0.0, HEAD_RADIUS)
  #glRotatef(0, 1.0, 0.0, 0.0)
  nose()

  #eyes
  magenta()
  glTranslatef(HEAD_RADIUS/2, HEAD_RADIUS/2, 0.0)
  #glRotatef(0, 1.0, 0.0, 0.0)
  nose()

  glTranslatef(-HEAD_RADIUS, 0.0, 0.0)
  #glRotatef(0, 1.0, 0.0, 0.0)
  nose()

  #LEFT UPPER ARM
  glEnable(GL_TEXTURE_2D)
  glPopMatrix()
  glPushMatrix()
  red()
  glTranslatef(LUAX, LUAY, 0.0)
  glRotatef(t3, 1.0, 0.0, 0.0)
  upper_arm()

  #LEFT LOWER ARM
  green()
  glTranslatef(0.0, LLAY, 0.0)
  glRotatef(t4, 1.0, 0.0, 0.0)
  lower_arm()

  #RIGHT UPPER ARM
  glPopMatrix()
  glPushMatrix()
  blue()
  glTranslatef(RUAX, RUAY, 0.0)
  glRotatef(t5, 1.0, 0.0, 0.0)
  upper_arm()

  #RIGHT UPPER ARM
  cyan()
  glTranslatef(0.0, RLAY, 0.0)
  glRotatef(t6, 1.0, 0.0, 0.0)
  lower_arm()

  #LEFT UPPER LEG
  glPopMatrix()
  glPushMatrix()
  magenta()
  glTranslatef(LULX, LULY, 0.0)
  glRotatef(t7, 1.0, 0.0, 0.0)
  upper_leg()

  #LEFT LOWER LEG
  yellow()
  glTranslatef(0.0, LLLY, 0.0)
  glRotatef(t8, 1.0, 0.0, 0.0)
  lower_leg()

  #RIGHT UPPER LEG
  glPopMatrix()
  glPushMatrix()
  pink()
  glTranslatef(RULX, RULY, 0.0)
  glRotatef(t9, 1.0, 0.0, 0.0)
  upper_leg()

  #RIGHT LOWER LEG
  gray()
  glTranslatef(0.0, RLLY, 0.0)
  glRotatef(t10, 1.0, 0.0, 0.0)
  lower_leg()

  glPopMatrix()
  #glutSwapBuffers()
  glFlush()

def torso():
  glPushMatrix()
  glRotatef(-90.0, 1.0, 0.0, 0.0)
  gluCylinder(p, TORSO_RADIUS, TORSO_RADIUS, TORSO_HEIGHT, 10, 10)
  glPopMatrix()

def head():
  glPushMatrix()
  glRotatef(-90.0, 1.0, 0.0, 0.0)
  glutSolidSphere(HEAD_RADIUS, 10, 10)
  glPopMatrix()

def upper_arm():
  glPushMatrix()
  glTranslatef(0.0, 0.5*UPPER_ARM_HEIGHT, 0.0)
  glScalef(UPPER_ARM_WIDTH, UPPER_ARM_HEIGHT, UPPER_ARM_WIDTH)
  glutSolidCube(1.0)
  glPopMatrix()

def lower_arm():
  glPushMatrix()
  glTranslatef(0.0, 0.5*UPPER_ARM_HEIGHT, 0.0)
  glScalef(LOWER_ARM_WIDTH, LOWER_ARM_HEIGHT, LOWER_ARM_WIDTH)
  glutSolidCube(1.0)
  glPopMatrix()

def upper_leg():
  glPushMatrix()
  glTranslatef(0.0, 0.5*LOWER_ARM_HEIGHT, 0.0)
  glScalef(UPPER_LEG_WIDTH, UPPER_LEG_HEIGHT, UPPER_LEG_WIDTH)
  glutSolidCube(1.0)
  glPopMatrix()

def lower_leg():
  glPushMatrix()
  glTranslatef(0.0, 0.5*LOWER_ARM_HEIGHT, 0.0)
  glScalef(LOWER_LEG_WIDTH, LOWER_LEG_HEIGHT, LOWER_LEG_WIDTH)
  glutSolidCube(1.0)
  glPopMatrix()

def nose():
  glPushMatrix()
  glRotatef(-90.0, 1.0, 0.0, 0.0)
  glutSolidSphere(HEAD_RADIUS/5, 10, 10)
  glPopMatrix()

def red():
  glColor3f(1.0, 0.0, 0.0)
def green():
  glColor3f(0.0, 1.0, 0.0)
def blue():
  glColor3f(0.0, 0.0, 1.0)
def cyan():
  glColor3f(0.0, 1.0, 1.0)
def magenta():
  glColor3f(1.0, 1.0, 0.0)
def yellow():
  glColor3f(1.0, 0.0, 1.0)
def pink():
  glColor3f(1.0, 0.5, 0.5)
def gray():
  glColor3f(0.7, 0.7, 0.7)

def mykey(key, x, y):
  global t0, t1, t2, t3, t4, t5, t6, t7, t8, t9, t10
  if key=='d': # TORSO
    t0 = t0 + 10.0
  elif key=='D':
    t0 = t0 - 10.0
  elif key=='e': # HEAD 1
    t1 = t1 + 10.0
  elif key=='E':
    t1 = t1 - 10.0
  elif key=='r': # HEAD 2
    t2 = t2 + 10.0
  elif key=='R':
    t2 = t2 - 10.0
  elif key=='s': # LUA
    t3 = t3 + 10.0
  elif key=='S':
    t3 = t3 - 10.0
  elif key=='a': # LLA
    t4 = t4 + 10.0
  elif key=='A':
    t4 = t4 - 10.0
  elif key=='f': # RUA
    t5 = t5 + 10.0
  elif key=='F':
    t5 = t5 - 10.0
  elif key=='g': # RLA
    t6 = t6 + 10.0
  elif key=='G':
    t6 = t6 -10.0
  elif key=='x': # LUL
    t7 = t7 + 10.0
  elif key=='X':
    t7 = t7 - 10.0
  elif key=='z': # LLL
    t8 = t8 + 10.0
  elif key=='Z':
    t8 = t8 -10.0
  elif key=='c': # RUL
    t9 = t9 + 10.0
  elif key=='C':
    t9 = t9 - 10.0
  elif key=='v': # RLL
    t10 = t10 + 10.0
  elif key=='V':
    t10 = t10 - 10.0
  elif key=='q':
    sys.exit()
  elif key=='Q':
    sys.exit()

  print "params: ", t0, t1, t2, t3, t4, t5, t6, t7, t8, t9, t10
  glutPostRedisplay()

def materials(amb, diff, spec, shin):
  glMaterialfv(GL_FRONT_AND_BACK, GL_AMBIENT, amb)
  glMaterialfv(GL_FRONT_AND_BACK, GL_DIFFUSE, diff)
  glMaterialfv(GL_FRONT_AND_BACK, GL_SPECULAR, spec)
  glMaterialfv(GL_FRONT_AND_BACK, GL_SHININESS, shin)

glutInit( sys.argv )
#glutInitDisplayMode( GLUT_RGBA | GLUT_DOUBLE | GLUT_DEPTH )
glutInitDisplayMode( GLUT_RGBA | GLUT_SINGLE | GLUT_DEPTH )
glutInitWindowSize( 500, 500 )
glutInitWindowPosition(0,0)
glutCreateWindow( 'robot' )
glutDisplayFunc( display )
glutKeyboardFunc(mykey)

glEnable(GL_DEPTH_TEST) #hidden-usrface removal
glEnable(GL_CULL_FACE) #don't draw back side surface
glCullFace(GL_BACK) #don't draw back side surface

### TEXTURE
glEnable(GL_TEXTURE_2D)
# generate continuous one texture
# different format from C, void glGenTexture(n, *name)
texture=glGenTextures(1)

# use the generated texture
glBindTexture(GL_TEXTURE_2D, texture)

# read texture data from .bmp file ising Image library
image=Image.open("ksmt.bmp")
if len(image.getbands())!=4:
  image=image.convert("RGBA")
size=image.size

# generate texture from array image.tostring() inside current texture 'texture'
glTexImage2D(GL_TEXTURE_2D, 0, GL_RGBA, size[0], size[1], 0, GL_RGBA, GL_UNSIGNED_BYTE, image.tostring())

# set texture options, repeat same pattern
glTexParameterf(GL_TEXTURE_2D, GL_TEXTURE_WRAP_S, GL_REPEAT)
glTexParameterf(GL_TEXTURE_2D, GL_TEXTURE_WRAP_T, GL_REPEAT)

# set texture options, enlarge and shrink
glTexParameterf(GL_TEXTURE_2D, GL_TEXTURE_MAG_FILTER, GL_NEAREST)
glTexParameterf(GL_TEXTURE_2D, GL_TEXTURE_MIN_FILTER, GL_NEAREST)

# set texture options, slow but good image
glHint(GL_PERSPECTIVE_CORRECTION_HINT, GL_NICEST)

# enable auto generation of texture coordinate in s and t direction
glEnable(GL_TEXTURE_GEN_S)
glEnable(GL_TEXTURE_GEN_T)

# setup OBJECT_LINEAR ot EYE_LINEAR for auto texture coord generation
#glTexGeni(GL_S, GL_TEXTURE_GEN_MODE, GL_OBJECT_LINEAR)
#glTexGeni(GL_T, GL_TEXTURE_GEN_MODE, GL_OBJECT_LINEAR)
glTexGeni(GL_S, GL_TEXTURE_GEN_MODE, GL_EYE_LINEAR)
glTexGeni(GL_T, GL_TEXTURE_GEN_MODE, GL_EYE_LINEAR)

# Not successfull yet
#planes = 0.5, 0.0, 0.0, 0.5
#planet = 0.0, 0.5, 0.0, 0.5
#glTexGenfv(GL_S, GL_OBJECT_LINEAR, planes)
#glTexGenfv(GL_T, GL_OBJECT_LINEAR, planet)

### Lighting
glEnable(GL_LIGHTING) #use lighting
glEnable(GL_LIGHT0) #use a light 0
glEnable(GL_LIGHT1) #use a light 1

# light 0
light0_pos = 10.0, 10.0, 10.0, 0.0
diffuse0 = 0.5, 0.5, 0.5, 1.0
specular0 = 0.5, 0.5, 0.5, 1.0
ambient0 = 0.8, 0.8, 0.8, 1.0

glMatrixMode(GL_MODELVIEW)
glLightfv(GL_LIGHT0, GL_POSITION, light0_pos)
glLightfv(GL_LIGHT0, GL_DIFFUSE, diffuse0)
glLightfv(GL_LIGHT0, GL_SPECULAR, specular0)
glLightfv(GL_LIGHT0, GL_AMBIENT, ambient0)

# light 1
light1_pos = 0.0, 0.0, 10.0, 0.0
diffuse1 = 0.8, 0.8, 0.8, 1.0
specular1 = 0.2, 0.2, 0.2, 1.0
ambient1 = 0.2, 0.2, 0.2, 1.0

glLightfv(GL_LIGHT1, GL_POSITION, light1_pos)
glLightfv(GL_LIGHT1, GL_DIFFUSE, diffuse1)
glLightfv(GL_LIGHT1, GL_SPECULAR, specular1)
glLightfv(GL_LIGHT1, GL_AMBIENT, ambient1)

# Material
brass_amb = 0.33, 0.22, 0.03, 1.0
brass_diff = 0.78, 0.57, 0.11, 1.0
brass_spec = 0.99, 0.91, 0.81, 1.0
brass_shin = 27.8

p_amb = 0.3, 0.0, 0.0, 1.0
p_diff = 0.6, 0.0, 0.0, 1.0
p_spec = 0.8, 0.6, 0.6, 1.0
p_shin = 32.8

# create new Quadric 'p' for gluCylinder and set texture for it
p=gluNewQuadric()
gluQuadricDrawStyle(p, GLU_FILL)
gluQuadricNormals(p, GLU_SMOOTH)
#gluQuadricTexture(p, GL_TRUE)

glutMainLoop()
-------------------------------------------------
glTexGen,
Texture Mapping
TEXTURE is difficult to understand
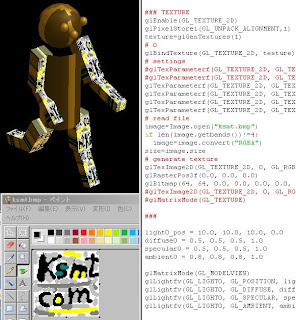 まったくテクスチャマッピングというのはさっぱり分かりません。入門書の内容が急に難解になり、分かりやすいサンプルがついていません。特にgluあるいはglutオブジェクトにどうやってテクスチャを貼るのかが分かりません。本に書いてあるようなのですが、例がないので理解できないのです。また、Webをいくら探してもPythonでglutソリッドモデルにテクスチャを貼った例が見つからないのです。全部glTexCoord2fでポリゴンにマップしています。
で、まる1日四苦八苦して、やっとなんとかテクスチャが貼れるようになったのですが、相変わらず理解できません。絵もコードもぐちゃぐちゃです。でも、まあ絵がでただけましで、これで前に進めると思います。
I cannot understand Texture Mapping yet. It's really complex and difficult to understand. I cannot find good example in books nor web. Most examples use glTexCoord2f. This is good for polygons, but not good for glu and glut solid models I'm using today.
After a whole day struggling on Texture, I finally can see something on screen. But, I still don't understand what happening. I can probably go further by looking at the pictures.
Followings are my findings yesterday and today on Texture Mapping.
1. Image library is usefull for reading Texture from graphic files. Install Image library from http://www.pythonware.com/products/pil/ on Python and "import Image".
2. Read a .bmp file into a matrix and specify the matrix as Texture.
image=Image.open("ksmt.bmp")
if len(image.getbands())!=4:
image=image.convert("RGBA")
size=image.size
# generate texture
glTexImage2D(GL_TEXTURE_2D, 0, GL_RGBA, size[0], size[1], 0, GL_RGBA, GL_UNSIGNED_BYTE, image.tostring())
3. Enable using 2D texture
glEnable(GL_TEXTURE_2D)
4. Enable? texture for gluQuadric object
p=gluNewQuadric()
gluQuadricDrawStyle(p, GLU_FILL)
gluQuadricNormals(p, GLU_SMOOTH)
gluQuadricTexture(p, GL_TRUE)
5. Enable auto texture coordinate generation
glEnable(GL_TEXTURE_GEN_S)
glEnable(GL_TEXTURE_GEN_T)
glTexGeni(GL_S, GL_TEXTURE_GEN_MODE, GL_OBJECT_LINEAR)
glTexGeni(GL_T, GL_TEXTURE_GEN_MODE, GL_OBJECT_LINEAR)
Something wrong in using glTexGenfv. I need to understand this
planes = 0.5, 0.0, 0.0, 0.5
planet = 0.0, 0.5, 0.0, 0.5
#glTexGenfv(GL_S, GL_OBJECT_LINEAR, planes)
#glTexGenfv(GL_T, GL_OBJECT_LINEAR, planet)
-------------------------------------------------
Python Image Library,
Texture Mapping
2008/05/11
Adding Light and Material to humanoid
 ロボットに真鍮の素材を指定し、照明を当ててみました。大分それらしくなってきましたね。
I added material as brass and I gave a light to the simple humanoid robot.
ちょっとコードが長くなったのですが、とりあえずそのまま貼ります。
import sys
import math
from OpenGL.GL import *
from OpenGL.GLU import *
from OpenGL.GLUT import *

TORSO_RADIUS=0.1
TORSO_HEIGHT=0.4

HEAD_RADIUS = 0.1

UPPER_ARM_HEIGHT=0.2
UPPER_ARM_WIDTH=0.07

LOWER_ARM_HEIGHT=0.2
LOWER_ARM_WIDTH=0.05

UPPER_LEG_HEIGHT=0.2
UPPER_LEG_WIDTH=0.08

LOWER_LEG_HEIGHT=0.2
LOWER_LEG_WIDTH=0.06

SHOLDER_WIDTH = 0.2
HIP_WIDTH = 0.2

HEADX=0.1
HEADY=TORSO_HEIGHT

LUAX=-1.0 * SHOLDER_WIDTH / 2
RUAX=SHOLDER_WIDTH / 2
LUAY=RUAY=TORSO_HEIGHT
LLAY=RLAY=LOWER_ARM_HEIGHT

LULX=-1.0 * HIP_WIDTH / 2
RULX=HIP_WIDTH / 2
LULY=RULY=0
LLLY=RLLY=LOWER_LEG_HEIGHT

t0=0.0
t1=0.0
t2=0.0
t3=90.0
t4=0.0
t5=90.0
t6=0.0
t7=180.0
t8=0.0
t9=180.0
t10=0.0

def display():
  glEnable(GL_DEPTH_TEST)
  glClear(GL_COLOR_BUFFER_BIT | GL_DEPTH_BUFFER_BIT)

  glMatrixMode(GL_PROJECTION)
  glLoadIdentity()
  gluPerspective(20, 1.0, 1.0, 100.0)

  glMatrixMode(GL_MODELVIEW)
  glLoadIdentity()
  gluLookAt(2.0, 2.0, 2.0, 0.0, 0.2, 0.0, 0.0, 1.0, 0.0)

  #TORSO
  gray()
  materials(brass_amb, brass_diff, brass_spec, brass_shin)
  glRotatef(t0, 0.0, 1.0, 0.0)
  torso()
  glPushMatrix()

  #HEAD
  cyan()
  glTranslatef(0.0, HEADX, 0.0)
  glRotatef(t1, 1.0, 0.0, 0.0)
  glRotatef(t2, 0.0, 1.0, 0.0)
  glTranslatef(0.0, HEADY, 0.0)
  head()

  #nose
  yellow()
  glTranslatef(0.0, 0.0, HEAD_RADIUS)
  #glRotatef(0, 1.0, 0.0, 0.0)
  nose()

  #eyes
  magenta()
  glTranslatef(HEAD_RADIUS/2, HEAD_RADIUS/2, 0.0)
  #glRotatef(0, 1.0, 0.0, 0.0)
  nose()

  glTranslatef(-HEAD_RADIUS, 0.0, 0.0)
  #glRotatef(0, 1.0, 0.0, 0.0)
  nose()

  #LEFT UPPER ARM
  glPopMatrix()
  glPushMatrix()
  red()
  glTranslatef(LUAX, LUAY, 0.0)
  glRotatef(t3, 1.0, 0.0, 0.0)
  upper_arm()

  #LEFT LOWER ARM
  green()
  glTranslatef(0.0, LLAY, 0.0)
  glRotatef(t4, 1.0, 0.0, 0.0)
  lower_arm()

  #RIGHT UPPER ARM
  glPopMatrix()
  glPushMatrix()
  blue()
  glTranslatef(RUAX, RUAY, 0.0)
  glRotatef(t5, 1.0, 0.0, 0.0)
  upper_arm()

  #RIGHT UPPER ARM
  cyan()
  glTranslatef(0.0, RLAY, 0.0)
  glRotatef(t6, 1.0, 0.0, 0.0)
  lower_arm()

  #LEFT UPPER LEG
  glPopMatrix()
  glPushMatrix()
  magenta()
  glTranslatef(LULX, LULY, 0.0)
  glRotatef(t7, 1.0, 0.0, 0.0)
  upper_leg()

  #LEFT LOWER LEG
  yellow()
  glTranslatef(0.0, LLLY, 0.0)
  glRotatef(t8, 1.0, 0.0, 0.0)
  lower_leg()

  #RIGHT UPPER LEG
  glPopMatrix()
  glPushMatrix()
  pink()
  glTranslatef(RULX, RULY, 0.0)
  glRotatef(t9, 1.0, 0.0, 0.0)
  upper_leg()

  #RIGHT LOWER LEG
  gray()
  glTranslatef(0.0, RLLY, 0.0)
  glRotatef(t10, 1.0, 0.0, 0.0)
  lower_leg()

  glPopMatrix()
  #glutSwapBuffers()
  glFlush()

def torso():
  glPushMatrix()
  glRotatef(-90.0, 1.0, 0.0, 0.0)
  gluCylinder(p, TORSO_RADIUS, TORSO_RADIUS, TORSO_HEIGHT, 10, 10)
  glPopMatrix()

def head():
  glPushMatrix()
  glRotatef(-90.0, 1.0, 0.0, 0.0)
  glutSolidSphere(HEAD_RADIUS, 10, 10)
  glPopMatrix()

def upper_arm():
  glPushMatrix()
  glTranslatef(0.0, 0.5*UPPER_ARM_HEIGHT, 0.0)
  glScalef(UPPER_ARM_WIDTH, UPPER_ARM_HEIGHT, UPPER_ARM_WIDTH)
  glutSolidCube(1.0)
  glPopMatrix()

def lower_arm():
  glPushMatrix()
  glTranslatef(0.0, 0.5*UPPER_ARM_HEIGHT, 0.0)
  glScalef(LOWER_ARM_WIDTH, LOWER_ARM_HEIGHT, LOWER_ARM_WIDTH)
  glutSolidCube(1.0)
  glPopMatrix()

def upper_leg():
  glPushMatrix()
  glTranslatef(0.0, 0.5*LOWER_ARM_HEIGHT, 0.0)
  glScalef(UPPER_LEG_WIDTH, UPPER_LEG_HEIGHT, UPPER_LEG_WIDTH)
  glutSolidCube(1.0)
  glPopMatrix()

def lower_leg():
  glPushMatrix()
  glTranslatef(0.0, 0.5*LOWER_ARM_HEIGHT, 0.0)
  glScalef(LOWER_LEG_WIDTH, LOWER_LEG_HEIGHT, LOWER_LEG_WIDTH)
  glutSolidCube(1.0)
  glPopMatrix()

def nose():
  glPushMatrix()
  glRotatef(-90.0, 1.0, 0.0, 0.0)
  glutSolidSphere(HEAD_RADIUS/5, 10, 10)
  glPopMatrix()

def red():
  glColor3f(1.0, 0.0, 0.0)
def green():
  glColor3f(0.0, 1.0, 0.0)
def blue():
  glColor3f(0.0, 0.0, 1.0)
def cyan():
  glColor3f(0.0, 1.0, 1.0)
def magenta():
  glColor3f(1.0, 1.0, 0.0)
def yellow():
  glColor3f(1.0, 0.0, 1.0)
def pink():
  glColor3f(1.0, 0.5, 0.5)
def gray():
  glColor3f(0.7, 0.7, 0.7)

def mykey(key, x, y):
  global t0, t1, t2, t3, t4, t5, t6, t7, t8, t9, t10
  if key=='d': # TORSO
    t0 = t0 + 10.0
  elif key=='D':
    t0 = t0 - 10.0
  elif key=='e': # HEAD 1
    t1 = t1 + 10.0
  elif key=='E':
    t1 = t1 - 10.0
  elif key=='r': # HEAD 2
    t2 = t2 + 10.0
  elif key=='R':
    t2 = t2 - 10.0
  elif key=='s': # LUA
    t3 = t3 + 10.0
  elif key=='S':
    t3 = t3 - 10.0
  elif key=='a': # LLA
    t4 = t4 + 10.0
  elif key=='A':
    t4 = t4 - 10.0
  elif key=='f': # RUA
    t5 = t5 + 10.0
  elif key=='F':
    t5 = t5 - 10.0
  elif key=='g': # RLA
    t6 = t6 + 10.0
  elif key=='G':
    t6 = t6 -10.0
  elif key=='x': # LUL
    t7 = t7 + 10.0
  elif key=='X':
    t7 = t7 - 10.0
  elif key=='z': # LLL
    t8 = t8 + 10.0
  elif key=='Z':
    t8 = t8 -10.0
  elif key=='c': # RUL
    t9 = t9 + 10.0
  elif key=='C':
    t9 = t9 - 10.0
  elif key=='v': # RLL
    t10 = t10 + 10.0
  elif key=='V':
    t10 = t10 - 10.0
  elif key=='q':
    sys.exit()

  print "params: ", t0, t1, t2, t3, t4, t5, t6, t7, t8, t9, t10
  glutPostRedisplay()

def materials(amb, diff, spec, shin):
  glMaterialfv(GL_FRONT_AND_BACK, GL_AMBIENT, amb)
  glMaterialfv(GL_FRONT_AND_BACK, GL_DIFFUSE, diff)
  glMaterialfv(GL_FRONT_AND_BACK, GL_SPECULAR, spec)
  glMaterialfv(GL_FRONT_AND_BACK, GL_SHININESS, shin)

glutInit( sys.argv )
#glutInitDisplayMode( GLUT_RGBA | GLUT_DOUBLE | GLUT_DEPTH )
glutInitDisplayMode( GLUT_RGBA | GLUT_SINGLE | GLUT_DEPTH )
glutInitWindowSize( 500, 500 )
glutInitWindowPosition(0,0)
glutCreateWindow( 'robot' )
glutDisplayFunc( display )
glutKeyboardFunc(mykey)

glEnable(GL_DEPTH_TEST)
glEnable(GL_CULL_FACE)
glCullFace(GL_BACK)

glEnable(GL_LIGHTING)
glEnable(GL_LIGHT0)

light0_pos = 10.0, 10.0, 10.0, 0.0
diffuse0 = 0.5, 0.5, 0.5, 1.0
specular0 = 0.5, 0.5, 0.5, 1.0
ambient0 = 0.8, 0.8, 0.8, 1.0

glMatrixMode(GL_MODELVIEW)
glLightfv(GL_LIGHT0, GL_POSITION, light0_pos)
glLightfv(GL_LIGHT0, GL_DIFFUSE, diffuse0)
glLightfv(GL_LIGHT0, GL_SPECULAR, specular0)
glLightfv(GL_LIGHT0, GL_AMBIENT, ambient0)

p=gluNewQuadric()
gluQuadricDrawStyle(p, GLU_FILL)
gluQuadricNormals(p, GLU_SMOOTH)

brass_amb = 0.33, 0.22, 0.03, 1.0
brass_diff = 0.78, 0.57, 0.11, 1.0
brass_spec = 0.99, 0.91, 0.81, 1.0
brass_shin = 27.8

p_amb = 0.3, 0.0, 0.0, 1.0
p_diff = 0.6, 0.0, 0.0, 1.0
p_spec = 0.8, 0.6, 0.6, 1.0
p_shin = 32.8

glutMainLoop()
-------------------------------------------------
glLight,
glMaterial
2008/05/10
gluPerspective error
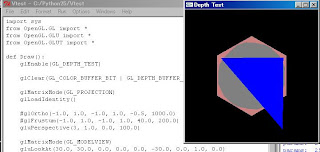 ロボットを作っているとき、どうしても隠面消去がうまくいかず、後で描画した図形が常に手前に見えます。原因を調べるのに丸一日かかりました。ああ、疲れた。上のような変な絵が出るのです。
When I made a simple humanoid, I found a problem in hidden-surface-removal. Polygons deawn late is always displayed. I spent whole one day to identify the source of the issue. Strange picture like above is always displayed.
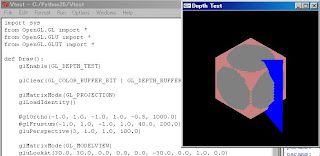 こちらは正常な隠面消去行われた様子です。原因が分かれば簡単でして、何度も読んだ”OpenGL入門”(エドワード・エンジェル著)にも次のように書いてあるのです。
"Alert! 前方クリッピング面にカメラをあまり近づけると、透視ビューに関するデプス計算で数値エラーにつながりかねない。”
This is the right one. "OpenGL, a PRIMER (Edward Angel)" said arithmetic error would heppen in depth calculation when the near clopping surface was too close from camera.
原因はまさにこれだったのですが、私はてっきり数値エラーでクラッシュするか、またはエラーメッセージが出るとばかり思っていました。しかし実際にはエラーは報告されず、ただ黙って隠面消去しない絵が表示されていたのでした。
I thought some messages should be reported when arithmetic errors happened. However, no errors reported and simply wrong picture was drawn.
GL_PROJECTIONにおける透視投影の設定にはgluPerspective()を使っていたのですが、これだけうまく動かないのです。glOrtho()やglFrustum()を使うとうまくいくのです。なのでgluPerspective()の設定だとばかり思っていました。確かにそうだったのですが、エラーが出ないので前方クリッピングの問題ではないと思い込んでいたのでした。ちなみに、glOrtho()やglFrustum()ではうまく行った理由は次の通りです。
- glOrtho() 直投影には前方クリッピング面は関係ありません
- glFrustum() 前方クリッピング面を慎重に調整しないとまともに絵が出ません。
それに引き替え、gluPerspective()は直観的で、すぐに絵が出るので、間違いに気づきにくかったのです。
OpenGL provide three ways to set camera. I used gluPerspective() which didn't work and other two worked fine because:
- glOrtho() near clipping surface doesn't mean enything
- glFrustum() I should adjust near clipping surface very carefully, otherwise no picture.
まあ、とにかく、
gluPerspective(3, 1.0, 0.0, 100.0) 絵は出るが隠面消去が間違っている
gluPerspective(3, 1.0, 1.0, 100.0) 正しい
ということがわかったのでした。
Anyway,
gluPerspective(3, 1.0, 0.0, 100.0) = wrong picrure diaplayed silently
gluPerspective(3, 1.0, 1.0, 100.0) = right picture
import sys
from OpenGL.GL import *
from OpenGL.GLU import *
from OpenGL.GLUT import *

def Draw():
    glEnable(GL_DEPTH_TEST)

    glClear(GL_COLOR_BUFFER_BIT | GL_DEPTH_BUFFER_BIT)

    glMatrixMode(GL_PROJECTION)
    glLoadIdentity()

    #glOrtho(-1.0, 1.0, -1.0, 1.0, -0.5, 1000.0) #good
    #glFrustum(-1.0, 1.0, -1.0, 1.0, 40.0, 200.0) #good
    #gluPerspective(3, 1.0, 0.0, 100.0) #bad hidden surface
    gluPerspective(3, 1.0, 1.0, 100.0)

    glMatrixMode(GL_MODELVIEW)
    gluLookAt(30.0, 30.0, 0.0, 0.0, 0.0, -30.0, 0.0, 1.0, 0.0)

    glBegin(GL_TRIANGLES)
    glColor3f(0.0, 0.0, 1.0)
    glVertex3f( 0.9, -0.9, -30.0)
    glVertex3f( 0.9,  0.9, -30.0)
    glVertex3f(-0.9,  0.0, -30.0)
    glEnd()

    glTranslatef(0.0, 0.0, -30.0)
    glColor3f(0.5, 0.5, 0.5)
    glutSolidSphere(0.7, 10, 10)

    glColor3f(0.8, 0.5, 0.5)
    glutSolidCube(1.0)
    glFlush();

glutInit(sys.argv)
glutInitDisplayMode(GLUT_DEPTH | GLUT_RGB | GLUT_SINGLE)
glutInitWindowSize(300, 300)
glutCreateWindow("Depth Test")
glutDisplayFunc(Draw)
glutMainLoop()
-------------------------------------------------
GL_DEPTH_TEST,
GL_PROJECTION,
gluPerspective
2008/05/09
Robot2 - simple humanoid
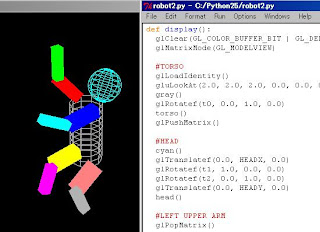 11軸の単純な人間型ロボットを作ってみました。胴体を中心とした全体回転1軸、頭2軸、手足各2軸x4本です。これも"OpenGL入門" エドワード・エンジェル著、滝沢徹・牧野祐子訳、ピアソン・エデュケーション刊を参考にして作ってみました。軸は多くなりましたが、glPush/PopMatrixが追加されただけで、原理は昨日のサンプルと全く同じです。Pythonはインタープリタでありデバッグが簡単なので、これくらいのコードなら数時間で動かせます。とても手軽です。キーボードで操作できます。大文字は逆方向に動きます。
e/E r/R (頭)
a/A s/S d/D f/F g/G (腕、胴体)
z/Z x/X c/C v/V (足)
Simple humanoid type robot with 11 moving axis, 1 for entire body, 2 for head, 2 for each leg, by refering a book "OpenGL, A PRIMER" by Edward Angel. glPush/PopMatrix is added to handle this complex structure. Python is pretty powerfull to debug my source code because it's an interpreter. You can operate the humanoid by using keyboard.
e/E r/R (head)
a/A s/S d/D f/F g/G (arms, entire body)
z/Z x/X c/C v/V (legs)
import sys
import math
from OpenGL.GL import *
from OpenGL.GLU import *
from OpenGL.GLUT import *

TORSO_RADIUS=0.1
TORSO_HEIGHT=0.4

UPPER_ARM_HEIGHT=0.2
UPPER_ARM_WIDTH=0.07

LOWER_ARM_HEIGHT=0.2
LOWER_ARM_WIDTH=0.05

UPPER_LEG_HEIGHT=0.2
UPPER_LEG_WIDTH=0.08

LOWER_LEG_HEIGHT=0.2
LOWER_LEG_WIDTH=0.06

SHOLDER_WIDTH = 0.2
HIP_WIDTH = 0.2

HEADX=0.1
HEADY=TORSO_HEIGHT

LUAX=-1.0 * SHOLDER_WIDTH / 2
RUAX=SHOLDER_WIDTH / 2
LUAY=RUAY=TORSO_HEIGHT
LLAY=RLAY=LOWER_ARM_HEIGHT

LULX=-1.0 * HIP_WIDTH / 2
RULX=HIP_WIDTH / 2
LULY=RULY=0
LLLY=RLLY=LOWER_LEG_HEIGHT

t0=0.0
t1=0.0
t2=0.0
t3=90.0
t4=0.0
t5=90.0
t6=0.0
t7=180.0
t8=0.0
t9=180.0
t10=0.0

def display():
  glClear(GL_COLOR_BUFFER_BIT | GL_DEPTH_BUFFER_BIT)
  glMatrixMode(GL_MODELVIEW)

  #TORSO
  glLoadIdentity()
  gluLookAt(2.0, 2.0, 2.0, 0.0, 0.0, 0.0, 0.0, 1.0, 0.0)
  gray()
  glRotatef(t0, 0.0, 1.0, 0.0)
  torso()
  glPushMatrix()

  #HEAD
  cyan()
  glTranslatef(0.0, HEADX, 0.0)
  glRotatef(t1, 1.0, 0.0, 0.0)
  glRotatef(t2, 0.0, 1.0, 0.0)
  glTranslatef(0.0, HEADY, 0.0)
  head()

  #LEFT UPPER ARM
  glPopMatrix()
  glPushMatrix()
  red()
  glTranslatef(LUAX, LUAY, 0.0)
  glRotatef(t3, 1.0, 0.0, 0.0)
  upper_arm()

  #LEFT LOWER ARM
  green()
  glTranslatef(0.0, LLAY, 0.0)
  glRotatef(t4, 1.0, 0.0, 0.0)
  lower_arm()

  #RIGHT UPPER ARM
  glPopMatrix()
  glPushMatrix()
  blue()
  glTranslatef(RUAX, RUAY, 0.0)
  glRotatef(t5, 1.0, 0.0, 0.0)
  upper_arm()

  #RIGHT UPPER ARM
  cyan()
  glTranslatef(0.0, RLAY, 0.0)
  glRotatef(t6, 1.0, 0.0, 0.0)
  lower_arm()

  #LEFT UPPER LEG
  glPopMatrix()
  glPushMatrix()
  magenta()
  glTranslatef(LULX, LULY, 0.0)
  glRotatef(t7, 1.0, 0.0, 0.0)
  upper_leg()

  #LEFT LOWER LEG
  yellow()
  glTranslatef(0.0, LLLY, 0.0)
  glRotatef(t8, 1.0, 0.0, 0.0)
  lower_leg()

  #RIGHT UPPER LEG
  glPopMatrix()
  glPushMatrix()
  pink()
  glTranslatef(RULX, RULY, 0.0)
  glRotatef(t9, 1.0, 0.0, 0.0)
  upper_leg()

  #RIGHT LOWER LEG
  gray()
  glTranslatef(0.0, RLLY, 0.0)
  glRotatef(t10, 1.0, 0.0, 0.0)
  lower_leg()

  glPopMatrix()
  glFlush()

def torso():
  glPushMatrix()
  glRotatef(-90.0, 1.0, 0.0, 0.0)
  gluCylinder(p, TORSO_RADIUS, TORSO_RADIUS, TORSO_HEIGHT, 10, 10)
  glPopMatrix()

def head():
  glPushMatrix()
  glRotatef(-90.0, 1.0, 0.0, 0.0)
  glutWireSphere(0.1, 10, 10)
  glPopMatrix()

def upper_arm():
  glPushMatrix()
  glTranslatef(0.0, 0.5*UPPER_ARM_HEIGHT, 0.0)
  glScalef(UPPER_ARM_WIDTH, UPPER_ARM_HEIGHT, UPPER_ARM_WIDTH)
  glutSolidCube(1.0)
  glPopMatrix()

def lower_arm():
  glPushMatrix()
  glTranslatef(0.0, 0.5*UPPER_ARM_HEIGHT, 0.0)
  glScalef(LOWER_ARM_WIDTH, LOWER_ARM_HEIGHT, LOWER_ARM_WIDTH)
  glutSolidCube(1.0)
  glPopMatrix()

def upper_leg():
  glPushMatrix()
  glTranslatef(0.0, 0.5*LOWER_ARM_HEIGHT, 0.0)
  glScalef(UPPER_LEG_WIDTH, UPPER_LEG_HEIGHT, UPPER_LEG_WIDTH)
  glutSolidCube(1.0)
  glPopMatrix()

def lower_leg():
  glPushMatrix()
  glTranslatef(0.0, 0.5*LOWER_ARM_HEIGHT, 0.0)
  glScalef(LOWER_LEG_WIDTH, LOWER_LEG_HEIGHT, LOWER_LEG_WIDTH)
  glutSolidCube(1.0)
  glPopMatrix()

def red():
  glColor3f(1.0, 0.0, 0.0)
def green():
  glColor3f(0.0, 1.0, 0.0)
def blue():
  glColor3f(0.0, 0.0, 1.0)
def cyan():
  glColor3f(0.0, 1.0, 1.0)
def magenta():
  glColor3f(1.0, 1.0, 0.0)
def yellow():
  glColor3f(1.0, 0.0, 1.0)
def pink():
  glColor3f(1.0, 0.5, 0.5)
def gray():
  glColor3f(0.7, 0.7, 0.7)

def mykey(key, x, y):
  global t0, t1, t2, t3, t4, t5, t6, t7, t8, t9, t10
  if key=='d': # TORSO
    t0 = t0 + 10.0
  elif key=='D':
    t0 = t0 - 10.0
  elif key=='e': # HEAD 1
    t1 = t1 + 10.0
  elif key=='E':
    t1 = t1 - 10.0
  elif key=='r': # HEAD 2
    t2 = t2 + 10.0
  elif key=='R':
    t2 = t2 - 10.0
  elif key=='s': # LUA
    t3 = t3 + 10.0
  elif key=='S':
    t3 = t3 - 10.0
  elif key=='a': # LLA
    t4 = t4 + 10.0
  elif key=='A':
    t4 = t4 - 10.0
  elif key=='f': # RUA
    t5 = t5 + 10.0
  elif key=='F':
    t5 = t5 - 10.0
  elif key=='g': # RLA
    t6 = t6 + 10.0
  elif key=='G':
    t6 = t6 -10.0
  elif key=='x': # LUL
    t7 = t7 + 10.0
  elif key=='X':
    t7 = t7 - 10.0
  elif key=='z': # LLL
    t8 = t8 + 10.0
  elif key=='Z':
    t8 = t8 -10.0
  elif key=='c': # RUL
    t9 = t9 + 10.0
  elif key=='C':
    t9 = t9 - 10.0
  elif key=='v': # RLL
    t10 = t10 + 10.0
  elif key=='V':
    t10 = t10 - 10.0
  elif key=='q':
    sys.exit()

  print "params: ", t0, t1, t2, t3, t4, t5, t6, t7, t8, t9, t10
  glutPostRedisplay()

glutInit( sys.argv )
glutInitDisplayMode( GLUT_SINGLE | GLUT_RGB )
glutInitWindowSize( 500, 500 )
glutInitWindowPosition(0,0)
glutCreateWindow( 'robot' )
glutDisplayFunc( display )
glutKeyboardFunc(mykey)
p=gluNewQuadric()
gluQuadricDrawStyle(p, GLU_LINE)

glClearColor(0.0, 0.0, 0.0, 0.0)

glMatrixMode(GL_PROJECTION)
glLoadIdentity()
gluPerspective(30, 1.0, 0.0, 100.0)

glutMainLoop()
-------------------------------------------------
glPush/PopMatrix,
Translate
2008/05/08
Robot - simple hierarchical model
 移動(Translate)や回転(Rotate)は拡大・縮小はインクリメンタルであるため、リセットしなければ変換用の行列に加算や乗算がどんどん加えられて行きます。土台、下腕、上腕を持つ簡単なロボットの例を、"OpenGL入門" エドワード・エンジェル著、滝沢徹・牧野祐子訳、ピアソン・エデュケーション刊を参考にして作ってみました。Cで書かれた部分的なサンプルコードをPythonに書き直すのは至って簡単でした。Translateの基本概念が前回分かったので、うんと楽です。ただ、変換の順番が問題になると、まだよく分かっていないことが露呈します。
Instance transformation is incremental. This is good for hierarchical instances with dependency on other objects in parent hierarchy. By refering a book "OpenGL, A PRIMER" by Edward Angel, I made a simple robot example using Python. "base" instance has a child instance "lower_arm" and "lower_arm" has a child instance "upper_arm". Translating C sample code to Python was very easy because I learned how the MODELVIEW matrix works.
In the following example, use key 'q', 'a', 'w', 's', 'e', 'd' to move each part of the robot.
import sys
import math
from OpenGL.GL import *
from OpenGL.GLU import *
from OpenGL.GLUT import *

BASE_RADIUS = 0.1
BASE_HEIGHT = 0.1
UPPER_ARM_WIDTH = 0.05
UPPER_ARM_HEIGHT=0.5
LOWER_ARM_WIDTH=0.08
LOWER_ARM_HEIGHT=0.3
tb=0
tl=45
tu=30

def display():
  glClear(GL_COLOR_BUFFER_BIT | GL_DEPTH_BUFFER_BIT)
  glMatrixMode(GL_MODELVIEW)

  glLoadIdentity()
  gluLookAt(2.0, 2.0, 2.0, 0.0, 0.0, 0.0, 0.0, 1.0, 0.0)
  glColor3f(1.0, 0.0, 0.0)
  glRotatef(tb, 0.0, 1.0, 0.0)
  base()
  glTranslatef(0.0, BASE_HEIGHT, 0.0)
  glColor3f(0.0, 1.0, 0.0)
  glRotatef(tl, 0.0, 0.0, 1.0)
  lower_arm()
  glTranslatef(0.0, LOWER_ARM_HEIGHT, 0.0)
  glRotatef(tu, 0.0, 0.0, 1.0)
  glColor3f(0.0, 0.0, 1.0)
  upper_arm()
  glFlush()

def base():
  glPushMatrix()
  glRotatef(-90.0, 1.0, 0.0, 0.0)
  gluCylinder(p, BASE_RADIUS, BASE_RADIUS, BASE_HEIGHT, 10, 10)
  glPopMatrix()

def upper_arm():
  glPushMatrix()
  glTranslatef(0.0, 0.5*UPPER_ARM_HEIGHT, 0.0)
  glScalef(UPPER_ARM_WIDTH, UPPER_ARM_HEIGHT, UPPER_ARM_WIDTH)
  glutSolidCube(1.0)
  glPopMatrix()

def lower_arm():
  glPushMatrix()
  glTranslatef(0.0, 0.5*LOWER_ARM_HEIGHT, 0.0)
  glScalef(LOWER_ARM_WIDTH, LOWER_ARM_HEIGHT, LOWER_ARM_WIDTH)
  glutSolidCube(1.0)
  glPopMatrix()

def mykey(key, x, y):
  global tb, tl, tu
  if key=='q': # +base
    tb = tb + 5.0
  elif key=='a': # -base
    tb = tb - 5.0
  elif key=='w': #+lower
    tl = tl + 5.0
  elif key=='s': #-lower
    tl = tl - 5.0
  elif key=='e': #+upper
    tu = tu + 5.0
  elif key=='d': #-upper
    tu = tu - 5.0
  print "tb=", tb, " tl=", tl, " tu=", tu
  glutPostRedisplay()

glutInit( sys.argv )
glutInitDisplayMode( GLUT_SINGLE | GLUT_RGB )
glutInitWindowSize( 500, 500 )
glutInitWindowPosition(0,0)
glutCreateWindow( 'robot' )
glutDisplayFunc( display )
glutKeyboardFunc(mykey)
p=gluNewQuadric()
gluQuadricDrawStyle(p, GLU_LINE)

glClearColor(0.0, 0.0, 0.0, 0.0)

glMatrixMode(GL_PROJECTION)
glLoadIdentity()
gluPerspective(30, 1.0, 0.0, 100.0)

glutMainLoop()
real meening of gluLookAt
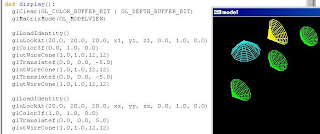 この2日ほどカメラ座標の移動に取り組んでいたのですが、やっと分かりました。OpenGLはあくまでもMODELVIEW行列を設定してから何か絵を描くと、MODELVIEW行列で指定した位置、方向、大きさでモデルが描画されるというだけのAPIなのです。これが、オブジェクト指向や、データベースや、オブジェクトの絶対座標とカメラの移動などに慣れている人には大きな関門になるのです。本をよく読むと、次のようなことが書いてはあるのですが、なかなか理解できませんでした。
・カメラは動かない。常に図形側を全部動かす。
・gluLookAt関数はカメラの移動であるが、実際にはカメラの移動の逆行列をセットしているだけ。
・glLoadIdentity()を実行するとgluLookAtでセットされた行列もリセットされる。カメラは元の位置に戻る。
・glLoadIdentity()実行後に元のカメラ位置で描画するには、再度gluLookAtを実行する。
・データベースはなく、画面に書いているだけである。再描画をすると全部書き直すだけである。
・データベース構築はアプリケーションの責任
I spent whole two two days to understand gluLookAt() command. This just set inversed matrix of MODELVIEW. This simulate camera movement, but it is not a real camera movement. This is very difficult to understand for person who is using Object oriented, database, camera movement with world coordinate system. There are no actual camera movement, no world coordinate system, no database in OpenGL API. It just draw pictures on screen using fixed camera and MODELVIEW matrix. Books said as follows which was really difficult for me to understand.
- Camera position is fixed. We always move all drawing objects which is MODELVIEW.
- gluLookAt simulate camera movement. But, it just set inverse matrix of MODELVIEW.
- glLoadIdentity() reset matrix set by gluLookAt(). glLoadIdentity() resets camera movement.
- After glLoadIdentity(), use the same gluLookAt() to draw something from the camera positon.
- OpenGL doesn't handle database onject. It just draw something on screen.
- Database sould be done by application outside OpenGL.
このサンプルでは、キーボードを押して、異なる図形に異なるカメラアングルを与えることができます。
The following example moves two different cameras for different group of objects.
Please push the following keys to see what happens.
h
j
k
u
m
i
n
a
d
w
x
e
z
v
b
#movey.py

import sys
from OpenGL.GL import *
from OpenGL.GLU import *
from OpenGL.GLUT import *
xx=yy=zz=x1=y1=z1=0.0
fov=30.0

def display():
  glClear(GL_COLOR_BUFFER_BIT | GL_DEPTH_BUFFER_BIT)
  glMatrixMode(GL_MODELVIEW)

  glLoadIdentity()
  gluLookAt(20.0, 20.0, 20.0, x1, y1, z1, 0.0, 1.0, 0.0)
  glColor3f(0.0, 1.0, 0.0)
  glutWireCone(1.0,1.0,12,12)
  glTranslatef(0.0, 0.0, -5.0)
  glutWireCone(1.0,1.0,12,12)
  glTranslatef(0.0, 0.0, -5.0)
  glutWireCone(1.0,1.0,12,12)

  glLoadIdentity()
  gluLookAt(20.0, 20.0, 20.0, xx, yy, zz, 0.0, 1.0, 0.0)
  glColor3f(1.0, 1.0, 0.0)
  glTranslatef(0.0, 0.0, 5.0)
  glutWireCone(1.0,1.0,12,12)

  glLoadIdentity()
  gluLookAt(20.0, 20.0, 20.0, xx, yy, zz, 0.0, 1.0, 0.0)
  glColor3f(0.0, 1.0, 1.0)
  glTranslatef(0.0, 0.0, 8.0)
  glRotatef(-90, 1.0, 0.0, 0.0)
  glutWireCone(1.0,1.0,12,12)

  glFlush()

def mykey(key, x, y):
  global xx, yy, zz, x1, y1, z1, fov
  if key=='k': # +x
    xx = xx + 1.0
    print "xx=", xx
  elif key=='h': # -x
    xx = xx - 1.0
    print "xx=", xx
  elif key=='u': #+y
    yy = yy + 1.0
    print "yy=", yy
  elif key=='m': #-y
    yy = yy - 1.0
    print "yy=", yy
  elif key=='i': #-z
    zz = zz - 1.0
    print "zz=", zz
  elif key=='n': #+z
    zz = zz + 1.0
    print "zz=", zz

  elif key=='d': # +x1
    x1 = x1 + 1.0
    print "x1=", x1
  elif key=='a': # -x1
    x1 = x1 - 1.0
    print "x1=", x1
  elif key=='w': #+y1
    y1 = y1 + 1.0
    print "y1=", y1
  elif key=='x': #-y1
    y1 = y1 - 1.0
    print "y1=", y1
  elif key=='e': #-z1
    z1 = z1 - 1.0
    print "z1=", z1
  elif key=='z': #+z1
    z1 = z1 + 1.0
    print "z1=", z1

  elif key=='j': # center camera to origin 0,0
    xx=yy=zz=x1=y1=z1=0.0
    fov=30
    print "reset x,y,z to (0,0)"
  elif key=='v': # +fov
    fov = fov + 5
  elif key=='b': #-fov
    fov = fov - 5

  glMatrixMode(GL_PROJECTION)
  glLoadIdentity()
  gluPerspective(fov, 1.0, 0.0, 100.0)

  glutPostRedisplay()

glutInit( sys.argv )
glutInitDisplayMode( GLUT_SINGLE | GLUT_RGB )
glutInitWindowSize( 500, 500 )
glutInitWindowPosition(0,0)
glutCreateWindow( 'model' )
glutDisplayFunc( display )
glutKeyboardFunc(mykey)

glClearColor(0.0, 0.0, 0.0, 0.0)

glMatrixMode(GL_PROJECTION)
glLoadIdentity()
gluPerspective(30, 1.0, 0.0, 100.0)

glutMainLoop()
2008/05/06
gluLookAt by keyboard
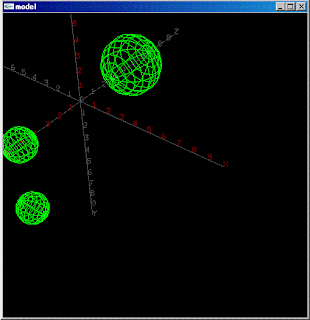 gluLookAt()関数を使って、キーボードを使ってカメラをパンできるようになりました。使用するキーは次の通り。
# u(+y) i(-z)
# h(-x) j(reset) k(+x)
# n(+z) m(-y)
レンズの光軸の指す点を3次元座標で指定するのですが、たとえばキー"k"を押すと、その座標が+1されて、カメラがちょっと右向きます。すると景色は左に動きます。
I can pan the camera by using gluLookAt() command and keyboard. Push a key, u, i, h,j,k,n, or m, camera will pan accordingly.
# u(+y) i(-z)
# h(-x) j(reset) k(+x)
# n(+z) m(-y)
For example, push 'k' key once, x=x+1. You pan right your camera to a point x+1, y, z. Thus, objects you are seeing will move to left.
import sys
from OpenGL.GL import *
from OpenGL.GLU import *
from OpenGL.GLUT import *

# draw x, y, z axis with index
# draw 3 sphere
# use keyboard to pan camera from a position (20,20,20)
#
#     u(+y) i(-z)
#  h(-x)  j(reset) k(+x)
#    n(+z) m(-y)

def display():
  glClear(GL_COLOR_BUFFER_BIT)
  axis()
  glColor3f(0.0, 1.0, 0.0)
  mySphere = gluNewQuadric()
  gluQuadricDrawStyle(mySphere, GLU_LINE)

  glTranslatef(0.0, 0.0, -5.0)
  gluSphere(mySphere, 2.0, 12, 12)

  glTranslatef(0.0, 0.0, 10.0)
  gluSphere(mySphere, 1.0, 12, 12)

  glTranslatef(0.0, -5.0, 0.0)
  glRotatef(90.0, 0.0, 1.0, 0.0)
  gluSphere(mySphere, 1.0, 12, 12)

  glFlush()

def axis():
  glClear( GL_COLOR_BUFFER_BIT )

  glBegin(GL_LINES)
  glColor3f(0.3, 0.3, 0.3)
  glVertex3f(-10.0, 0.0, 0.0)
  glVertex3f(10.0, 0.0, 0.0)
  glVertex3f(0.0, -10.0, 0.0)
  glVertex3f(0.0, 10.0, 0.0)
  glVertex3f(0.0, 0.0, -10.0)
  glVertex3f(0.0, 0.0, 10.0)
  glEnd()

  biggest = 10
  x = 88
  y = 89
  z = 90
  r = range (0,(biggest+1))
  for i in r:
    ascii = 48+i

    # x axis positive
    glRasterPos3f(i, 0.0, 0.0)
    glColor3f(0.3, 0.3, 0.3)
    if i==biggest:
      glutBitmapCharacter(GLUT_BITMAP_8_BY_13, x )
    else:
      glutBitmapCharacter(GLUT_BITMAP_8_BY_13, ascii)
    # x axis negative
    glRasterPos3f(-i, 0.0, 0.0)
    glColor3f(0.5, 0.0, 0.0)
    if i==biggest:
      glutBitmapCharacter(GLUT_BITMAP_8_BY_13, x)
    else:
      glutBitmapCharacter(GLUT_BITMAP_8_BY_13, ascii)

    # y axis positive
    glRasterPos3f(0.0, i, 0.0)
    glColor3f(0.3, 0.3, 0.3)
    if i==biggest:
      glutBitmapCharacter(GLUT_BITMAP_8_BY_13, y)
    else:
      glutBitmapCharacter(GLUT_BITMAP_8_BY_13, ascii)
    # x axis negative
    glRasterPos3f(0.0, -i, 0.0)
    glColor3f(0.5, 0.0, 0.0)
    if i==biggest:
      glutBitmapCharacter(GLUT_BITMAP_8_BY_13, y)
    else:
      glutBitmapCharacter(GLUT_BITMAP_8_BY_13, ascii)

    # z axis positive
    glRasterPos3f(0.0, 0.0, i)
    glColor3f(0.3, 0.3, 0.3)
    if i==biggest:
      glutBitmapCharacter(GLUT_BITMAP_8_BY_13, z)
    else:
      glutBitmapCharacter(GLUT_BITMAP_8_BY_13, ascii)
    # z axis negative
    glRasterPos3f(0.0, 0.0, -i)
    glColor3f(0.5, 0.0, 0.0)
    if i==biggest:
      glutBitmapCharacter(GLUT_BITMAP_8_BY_13, z)
    else:
      glutBitmapCharacter(GLUT_BITMAP_8_BY_13, ascii)

  glFlush()

def init():
  glClearColor(0.0, 0.0, 0.0, 0.0)
  glColor3f(0.0, 0.0, 0.0)
  glMatrixMode(GL_PROJECTION)
  glLoadIdentity()
  gluPerspective(30, 1.0, 0.0, 100.0)
  glMatrixMode(GL_MODELVIEW)
  glLoadIdentity()
  gluLookAt(20.0, 20.0, 20.0, xx, yy, zz, 0.0, 1.0, 0.0)

def mymouse(but, stat, x, y):
  if stat == GLUT_DOWN:
    if but == GLUT_LEFT_BUTTON:
      print x, y, "Press right button to exit"
    else:
      sys.exit()

def myidle():
  glutPostRedisplay()

def mykey(key, x, y):
  global xx, yy, zz
  if key=='k': # +x
    xx = xx + 1.0
    print "xx=", xx
  elif key=='h': # -x
    xx = xx - 1.0
    print "xx=", xx
  elif key=='u': #+y
    yy = yy + 1.0
    print "yy=", yy
  elif key=='m': #-y
    yy = yy - 1.0
    print "yy=", yy
  elif key=='i': #-z
    zz = zz - 1.0
    print "zz=", zz
  elif key=='n': #+z
    zz = zz + 1.0
    print "zz=", zz
  elif key=='j': # center camera to origin 0,0
    xx=yy=zz=0.0
    print "reset x,y,z to (0,0)"

  glMatrixMode(GL_MODELVIEW)
  glLoadIdentity()
  gluLookAt(20.0, 20.0, 20.0, xx, yy, zz, 0.0, 1.0, 0.0)
  glutPostRedisplay()

glutInit( sys.argv )
glutInitDisplayMode( GLUT_SINGLE | GLUT_RGB )
glutInitWindowSize( 500, 500 )
glutInitWindowPosition(0,0)
glutCreateWindow( 'model' )
glutDisplayFunc( display )
glutMouseFunc(mymouse)
glutKeyboardFunc(mykey)
xx=yy=zz=0.0
init()
glutMainLoop()
2008/05/05
Writing x, y and z axis
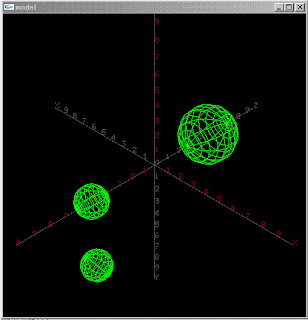 やっと少し3次元らしくなってきました。画面真っ黒からなかなか抜け出せなかったので、まずは、x, y, z軸を書いて目盛を文字で書いてみました。効果てきめんで、自分のカメラがどこを向いているのかやっと分かりました。
Some 3D graphics are one screen. I worked on black window for some time and then realized writing x/y/z axis with scale should help. This gives me a good idea which direction I'm lookign at.
ただし、glRasterPos3f()という関数のx,y,z軸の方向が逆を向いているようなのです。プラス方向とマイナス方向が逆みたいです。たとえば、
glRasterPos3f(1.0, 1.0, 1.0)
は
glTranslatef(-1.0, -1.0, -1.0)
と同じような意味を持っているようなのです。
glRasterPos3f() looks a little strange. Plus and minus directions are opposite on all axis.
まあ、とにかく画面真っ黒から座標軸が見えるようになったのは大きな進歩でして、少し先に進められそうです。OpenGLはステートマシン言語ですが、オブジェクト指向言語に慣れていると、とても分かりにくいですね。とにかくMODELVIEW行列(4x4)をセットして、何かオブジェクトを置くと、MODELVIEW行列でセットされた位置、向き、縮尺でオブジェクトが出てくるという感じです。
Anyway, now I can see x/y/z axis. OpenGL is a state machine language, not object oriented. I shoould set MODELVIEW matrix before creating an object.
今日のところのソースコードは次の通り。
Python source code as of today is as follows.
import sys
from OpenGL.GL import *
from OpenGL.GLU import *
from OpenGL.GLUT import *

def display():
  glColor3f(0.0, 1.0, 0.0)
  mySphere = gluNewQuadric()
  gluQuadricDrawStyle(mySphere, GLU_LINE)

  glTranslatef(0.0, 0.0, -5.0)
  gluSphere(mySphere, 2.0, 12, 12)

  glTranslatef(0.0, 0.0, 10.0)
  gluSphere(mySphere, 1.0, 12, 12)

  glTranslatef(0.0, -5.0, 0.0)
  glRotatef(90.0, 0.0, 1.0, 0.0)
  gluSphere(mySphere, 1.0, 12, 12)

  glFlush()

def axis():
  glClear( GL_COLOR_BUFFER_BIT )

  glBegin(GL_LINES)
  glColor3f(0.3, 0.3, 0.3)
  glVertex3f(-10.0, 0.0, 0.0)
  glVertex3f(10.0, 0.0, 0.0)
  glVertex3f(0.0, -10.0, 0.0)
  glVertex3f(0.0, 10.0, 0.0)
  glVertex3f(0.0, 0.0, -10.0)
  glVertex3f(0.0, 0.0, 10.0)
  glEnd()

  biggest = 10
  x = 88
  y = 89
  z = 90
  r = range (0,(biggest+1))
  for i in r:
    ascii = 48+i

    # x axis positive
    glRasterPos3f(i, 0.0, 0.0)
    glColor3f(0.3, 0.3, 0.3)
    if i==biggest:
      glutBitmapCharacter(GLUT_BITMAP_8_BY_13, x )
    else:
      glutBitmapCharacter(GLUT_BITMAP_8_BY_13, ascii)
    # x axis negative
    glRasterPos3f(-i, 0.0, 0.0)
    glColor3f(0.5, 0.0, 0.0)
    if i==biggest:
      glutBitmapCharacter(GLUT_BITMAP_8_BY_13, x)
    else:
      glutBitmapCharacter(GLUT_BITMAP_8_BY_13, ascii)

    # y axis positive
    glRasterPos3f(0.0, i, 0.0)
    glColor3f(0.3, 0.3, 0.3)
    if i==biggest:
      glutBitmapCharacter(GLUT_BITMAP_8_BY_13, y)
    else:
      glutBitmapCharacter(GLUT_BITMAP_8_BY_13, ascii)
    # x axis negative
    glRasterPos3f(0.0, -i, 0.0)
    glColor3f(0.5, 0.0, 0.0)
    if i==biggest:
      glutBitmapCharacter(GLUT_BITMAP_8_BY_13, y)
    else:
      glutBitmapCharacter(GLUT_BITMAP_8_BY_13, ascii)

    # z axis positive
    glRasterPos3f(0.0, 0.0, i)
    glColor3f(0.3, 0.3, 0.3)
    if i==biggest:
      glutBitmapCharacter(GLUT_BITMAP_8_BY_13, z)
    else:
      glutBitmapCharacter(GLUT_BITMAP_8_BY_13, ascii)
    # z axis negative
    glRasterPos3f(0.0, 0.0, -i)
    glColor3f(0.5, 0.0, 0.0)
    if i==biggest:
      glutBitmapCharacter(GLUT_BITMAP_8_BY_13, z)
    else:
      glutBitmapCharacter(GLUT_BITMAP_8_BY_13, ascii)

  glFlush()

def init():
  glClearColor(0.0, 0.0, 0.0, 0.0)
  glColor3f(0.0, 0.0, 0.0)
  glMatrixMode(GL_PROJECTION)
  glLoadIdentity()
  gluPerspective(30, 1.0, 0.0, 100.0)
  glMatrixMode(GL_MODELVIEW)
  glLoadIdentity()
  gluLookAt(20.0, 20.0, 20.0, 0.0, 0.0, 0.0, 0.0, 1.0, 0.0)
  axis()
def mymouse(but, stat, x, y):
  if stat == GLUT_DOWN:
    if but == GLUT_LEFT_BUTTON:
      print x, y, "Press right button to exit"
    else:
      sys.exit()

glutInit( sys.argv )
glutInitDisplayMode( GLUT_SINGLE | GLUT_RGB )
glutInitWindowSize( 500, 500 )
glutInitWindowPosition(0,0)
glutCreateWindow( 'model' )
glutDisplayFunc( display )
glutMouseFunc(mymouse)

init()
glutMainLoop()
2008/05/04
glutCreateMenu
 glutCreateMenuを実行するとエラーになるのですが、その意味が分かりません。OpenGLが標準でサポートするのは通常マウスの右ボタンに設定するポップアップメニューだけなのですが、これの使い方がわからないのです。本やWebで見つかるにCのサンプルがPythonでは動きません。当面メニュー無しでやります。解決策をご存じの方はぜひ教えて下さい。
glutCreateMenu doesn't work on my Python environment using some example codes I can find in bookes and web written in C language. I should continue larning OpenGL without using popup menus. If you have any suggestion, please let me know.
###Error Message
Traceback (most recent call last):
File "C:/Python25/menu.py", line 28, in
glutCreateMenu(mymenu)
File "C:\Python25\Lib\site-packages\OpenGL\GLUT\special.py", line 169, in glutCreateMenu
result = simple.glutCreateMenu( cCallback )
ArgumentError: argument 1:
### Sourece cose
import sys
from OpenGL.GL import *
from OpenGL.GLU import *
from OpenGL.GLUT import *

def display():
  glClear( GL_COLOR_BUFFER_BIT )
  glBegin(GL_POLYGON)
  glVertex2f(-0.5, -0.5)
  glVertex2f(-0.5, 0.5)
  glVertex2f(0.5, 0.5)
  glVertex2f(0.5, -0.5)
  glEnd()

def mymenu(value):
  if value == 1:
    glClear(GL_COLOR_BUFFERF_BIT)
  if value == 2:
    sys.exit()

glutInit( sys.argv )
glutInitDisplayMode( GLUT_SINGLE | GLUT_RGB )
glutInitWindowSize( 500, 500 )
glutInitWindowPosition(0,0)
glutCreateWindow( 'simple' )
glutDisplayFunc( display )

glutCreateMenu(mymenu)
glutAddMenuEntry("clear",1)
glutAddMenuEntry("exit",2)
glutAttachMenu(GLUT_RIGHT_BUTTON)

glutMainLoop()
-------------------------------------------------
glutCreateMenu
glutReshapeFunc
 glutReshapeFuncは、実行途中にウインドウの大きさが変更された時に起動されるコールバックを定義できるのですが、これを行うとPythonがクラッシュしてしまいます。昨日からいろいろと試したのですが、どうにもなりません。当面はウィンドウのリサイズは禁止ということで進めたいと思います。もし解決策をご存じでしたら教えて下さい。
If I define any callback routine to "glutReshapeFunc" which I can define a routine to be invoked after graphic window size is changed by user. Unfortunately, this crashes both Python shell and IDLE. I tried to fix this by changing my code in several different ways, but I couldn't. If you have any suggestion to solve this problem, please let me know.
Sample code which cause crash:
import sys
from OpenGL.GL import *
from OpenGL.GLU import *
from OpenGL.GLUT import *

def display():
  glClear( GL_COLOR_BUFFER_BIT )
  glBegin(GL_POLYGON)
  glColor3f(1.0, 1.0, 1.0)
  glVertex2f(-0.5, -0.5)
  glVertex2f(-0.5, 0.5)
  glVertex2f(0.5, 0.5)
  glVertex2f(0.5, -0.5)
  glEnd()
  glColor3f(1.0, 0.0, 0.0)
  glRasterPos2f(0.3, 0.3)
  glutBitmapCharacter(GLUT_BITMAP_8_BY_13, 65)
  glFlush()

def reshape(w, h):
  print "reshape detected"
  glutPostRedisplay()

glutInit( sys.argv )
glutInitDisplayMode( GLUT_SINGLE | GLUT_RGB )
glutInitWindowSize( 500, 500 )
glutInitWindowPosition(0,0)
glutCreateWindow( 'simple' )
glutDisplayFunc( display )
glutReshapeFunc( reshape )
glutMainLoop()
-------------------------------------------------
glutReshapeFunc
登録:
コメント (Atom)
