ラベル Texture Mapping の投稿を表示しています。 すべての投稿を表示

2009/02/17

PIL (Python Image Library)による画像分割

For OpenGL texture mapping, only limited size picture can be accepted such as 128x128, and 256x256. I should cut large picture (such as 1500 x 9000) into smaller pieces such as 256 x 256
for OpenGL texture mapping. In Python, I can use PIL to do this. I included PIL sample and OpenGL sample to read the small jpeg files.

OpenGLのテクスチャーは128とか256とか512という2の累乗のサイズの画像しか受け付けません。CubicVRでは普通3000 x 3000ピクセルとかの画像を上下左右前後6枚使います。(私の使う画像は6枚が縦に繋がっています) jpegで保存された大きな画像をPythonで読みだして、複数の256x256の小さな画像に切り分け、またjpegで書き出すプログラムをPIL (Python Image Library)で作ってみました。これで、いくら大きな画像でもPython/OpenGLのCubicVR Viewerに読み込むことができます。ついでにOpenGLに読み込む時のPythonのサンプルもつけます。

#6枚の正方形画像が縦につながった大きな画像をtex_size x tex_sizeの小さな画像に分割して, jpegで保存

def prep_tex (pfname):
global rc, image_x
im=Image.open(pfname)
size=im.size
image_x = size[0]
image_y = size[1]

if image_x*6 == image_y:
print "good y = 6x"
else:
print "error y != 6x"
sys.exit

rc = image_x / tex_size
rc_mod = image_x % tex_size
if rc_mod != 0:
rc = rc + 1

for face in range(6):
for y in range(rc):
for x in range(rc):
x1 = tex_size*x
x2 = x1 + tex_size
y1 = face * image_x + tex_size * y
y2 = y1 + tex_size

box = (x1, y1, x2, y2)
region = im.crop(box)
fname = '%s%d%d%d%s' % (pfname, face, y, x, ".jpg")
region.save(fname)
print (face, y, x, x1, y1, x2, y2, fname)

# 分割されたjpegファイルを読みだして、OpenGLのTextureに変換
tex_num=0
glEnable(GL_TEXTURE_2D)
texture=glGenTextures(rc*rc*6)
for face in range(6):
for y in range(rc):
for x in range(rc):
fname = '%s%d%d%d%s' % ("./pcube/sjtex", face, y, x, ".jpg")
gentex(texture[tex_num], fname)
#print 'reading texture %s %d' % (fname, tex_num)
tex_num = tex_num+1

2008/06/09

The result of 360 degree cubic panorama player looks like this. Type keys to rotate/zoom the panorama image.
"s" home position
"a" rotate left
"d" rotate right
"w" rotate up
"x" rotate down
"-" zoom in
"+" zoom out

実行するとこんな感じで表示されます。キーボードを使って回転させます。

I should do the following thins to fix issues or enhance usability. 次のような点を改善しなければなりません。
1. Rotate -90 degree of the initial image
2. Use mouse rather than keyboard
3. Fix bugs of rotation
4. Limit the FOV not to show black portion

QTVR functionality usign OpenGL (1)

To display 360 degree cubic panorama movie, either QuickTime(QTVR) or Adobe Flash player is used as viewer. I like QTVR very much and I participate "World Wide Panorama" ten times, http://geoimages.berkeley.edu/worldwidepanorama/wwppeople/html/RikuichiKishimoto.html
360度キュービックVRの表示には通常QuickTime(QTVR)またはAdobe Flash Playerが使われます。私はQTVRの製作が趣味でして、World Wide Panoramaにも参加しています。

It would be very easy to implement 360 degree cubic panorama viewer using OpenGL. The source image has 6 cubic faces in one JPEG file.
OpenGLでキュービックパノラマを実現することは、割と簡単だと思われますので、やってみました。普通は次のような6面の画像を繋げたJPEGの画像を使いますが、簡単化のため6枚の別々の写真に分けました。
I manually cut the image into 6 pieces to simplify the OpenGL program.
Convert six JPEG files into six texture and attach to six cubic faces. It's very straight foward. The following code still have some bugs, but I can show you the basic idea. It's really a "inside rotating cube". まだバグなどがありますが、アイデアとしては次のようなものになります。


import sys
import math
import Image
from OpenGL.GL import *
from OpenGL.GLU import *
from OpenGL.GLUT import *

vertices = ((-1.0, -1.0, 1.0), (-1.0, 1.0, 1.0), (1.0, 1.0, 1.0), (1.0, -1.0, 1.0),
(-1.0, -1.0, -1.0), (-1.0, 1.0, -1.0), (1.0, 1.0, -1.0), (1.0, -1.0, -1.0))
uuu = 0.1
fov = 120
xzt = yzt = 0
yyy = math.sin(yzt)
r = math.cos(yzt)
zzz = r * math.sin(xzt)
xxx = r * math.cos(xzt)

def polygon(a, b, c, d):
glBegin(GL_POLYGON)
glTexCoord2f(0.0, 0.0)
glVertex3fv(vertices[a])
glTexCoord2f(0.0, 1.0)
glVertex3fv(vertices[b])
glTexCoord2f(1.0, 1.0)
glVertex3fv(vertices[c])
glTexCoord2f(1.0, 0.0)
glVertex3fv(vertices[d])
glEnd()

def cube():
global texture
glEnable(GL_TEXTURE_2D)
glBindTexture(GL_TEXTURE_2D, texture[4])
polygon(4,5,6,7)
glBindTexture(GL_TEXTURE_2D, texture[1])
polygon(1,5,4,0)
glBindTexture(GL_TEXTURE_2D, texture[2])
polygon(3,7,6,2)
glBindTexture(GL_TEXTURE_2D, texture[0])
polygon(0,4,7,3)
glBindTexture(GL_TEXTURE_2D, texture[5])
polygon(1,0,3,2)
glBindTexture(GL_TEXTURE_2D, texture[3])
polygon(2,6,5,1)

def display():
glClear(GL_COLOR_BUFFER_BIT | GL_DEPTH_BUFFER_BIT)

glMatrixMode(GL_PROJECTION)
glLoadIdentity()

# set camera FOV=100 degree, aspect=1.0, near=1.0(0.0 will cause error), far=100.9
gluPerspective(fov, 1.0, 0.5, 100.0)

glMatrixMode(GL_MODELVIEW)
glLoadIdentity()
# eye, at, up
gluLookAt(0.0, 0.0, 0.0, xxx,yyy,zzz, 0,1,0)

cube()
glFlush()

def mykey(key, x, y):
global xxx, yyy, zzz, fov, xzt, yzt
if key=='a': # -xzt
xzt = xzt - uuu
elif key=='d': # +xzt
xzt = xzt + uuu
elif key=='x': # -yzt
yzt = yzt - uuu
elif key=='w': # +yzt
yzt = yzt + uuu
elif key=='s': # default
xzt = yzt = 0.0

elif key=='-': # zoom out
fov = fov - 10
elif key=='+': # default
fov = fov + 10

yyy = math.sin(yzt)
rrr = math.cos(yzt)
zzz = rrr * math.sin(xzt)
xxx = rrr * math.cos(xzt)

print "xyzf:", xxx, yyy, zzz, fov
glutPostRedisplay()

def gentex(t, img):
# use the given texture
glBindTexture(GL_TEXTURE_2D, t)
print "texture", t

# read texture data from .bmp file using Image library
image=Image.open(img)
if len(image.getbands())!=4:
image=image.convert("RGBA")
size=image.size

# generate texture from array image.tostring() inside current texture 'texture'
glTexImage2D(GL_TEXTURE_2D, 0, GL_RGBA, size[0], size[1], 0, GL_RGBA, GL_UNSIGNED_BYTE, image.tostring())

glTexParameterf(GL_TEXTURE_2D, GL_TEXTURE_MAG_FILTER, GL_NEAREST)
glTexParameterf(GL_TEXTURE_2D, GL_TEXTURE_MIN_FILTER, GL_NEAREST)

glutInit( sys.argv )
#glutInitDisplayMode( GLUT_RGBA | GLUT_DOUBLE | GLUT_DEPTH )
glutInitDisplayMode( GLUT_RGBA | GLUT_SINGLE | GLUT_DEPTH )
glutInitWindowSize( 500, 500 )
glutInitWindowPosition(0,0)
glutCreateWindow( 'cube' )
glutDisplayFunc( display )
glutKeyboardFunc(mykey)

glEnable(GL_DEPTH_TEST) #hidden-surface removal
# glEnable(GL_CULL_FACE) #don't draw back side surface
# glCullFace(GL_BACK) #don't draw back side surface

### TEXTURE
glEnable(GL_TEXTURE_2D)

# generate continuous two texture
# different format from C, void glGenTexture(n, *name)
texture=glGenTextures(6)

gentex(texture[0], "./pcube/r1.bmp")
gentex(texture[1], "./pcube/r2.bmp")
gentex(texture[2], "./pcube/r3.bmp")
gentex(texture[3], "./pcube/r4.bmp")
gentex(texture[4], "./pcube/rb.bmp")
gentex(texture[5], "./pcube/rt.bmp")

glutMainLoop()

2008/05/12

Multiple Texture

テクスチャーを2種類使ったサンプルです。どうやら次のような手順で2種類のテクスチャーを使うようです。
Sample procedure for using two texture.

#設定:一度やればいいようです。
#Setting parameters - you shoud do this only once
glEnable(GL_TEXTURE_2D)
glEnable(GL_TEXTURE_GEN_S)
glEnable(GL_TEXTURE_GEN_T)
glTexGeni(GL_S, GL_TEXTURE_GEN_MODE, GL_OBJECT_LINEAR)
glTexGeni(GL_T, GL_TEXTURE_GEN_MODE, GL_OBJECT_LINEAR)
glTexParameterf(GL_TEXTURE_2D, GL_TEXTURE_WRAP_S, GL_REPEAT)
glTexParameterf(GL_TEXTURE_2D, GL_TEXTURE_WRAP_T, GL_REPEAT)

#テクスチャーの空き番号を必要個数取得します。
# get multiple available texture ID
texture=glGenTextures(2)

#ひとつ目のテクスチャーに設定
# set the first texture as current texture
glBindTexture(GL_TEXTURE_2D, texture[0])

# 画像ファイルから数列にテクスチャデータを読み込みます
# read data from graphic file and store data in image.tostring()
image=Image.open("ksmt.bmp")
if len(image.getbands())!=4:
image=image.convert("RGBA")
size=image.size

# image.tostring()という数列のデータを使ってテクスチャーを作ります
# generate texture from image.tostring()
glTexImage2D(GL_TEXTURE_2D, 0, GL_RGBA, size[0], size[1], 0, GL_RGBA, GL_UNSIGNED_BYTE, image.tostring())

# 意味不明ですが、glTexImage2Dの後に次の2行がないとうまくテクスチャ ができません。
# I don't know why I should do this every time after glTexImage2D, but I must do this anyway.
glTexParameterf(GL_TEXTURE_2D, GL_TEXTURE_MAG_FILTER, GL_NEAREST)
glTexParameterf(GL_TEXTURE_2D, GL_TEXTURE_MIN_FILTER, GL_NEAREST)

# 二つ目のテクスチャに設定します。
# set the second texture as current texture
glBindTexture(GL_TEXTURE_2D, texture[1])

# ファイル(この場合TIF)から数列に画像データを読み込みます
# read data from the second file to memory
image=Image.open("f.tif")
if len(image.getbands())!=4:
image=image.convert("RGBA")
size=image.size

# 数列からテクスチャを作ります
# generate the second texture from memory
glTexImage2D(GL_TEXTURE_2D, 0, GL_RGBA, size[0], size[1], 0, GL_RGBA, GL_UNSIGNED_BYTE, image.tostring())

# 再びこの2行が必要です。どうやらテクスチャごとに必要のようです。
# I must do this again. I don't know the reason. This looks like a paramater setting.
glTexParameterf(GL_TEXTURE_2D, GL_TEXTURE_MAG_FILTER, GL_NEAREST)
glTexParameterf(GL_TEXTURE_2D, GL_TEXTURE_MIN_FILTER, GL_NEAREST)

#Display Funcの中でテクスチャを指定します。
#inside Display function
glDisable(GL_TEXTURE_2D) #テクスチャ不要の場合 no texture
#図形描画 #テクスチャなし図形 instanciate object with no texture
glEnable(GL_TEXTURE_2D) #テクスチャ貼り付け enable texture mapping
glBindTexture(GL_TEXTURE_2D, texture[0]) #ひとつ目のテクスチャを使う use the first texture
# 図形描画 #ひとつ目のテクスチャ instance object with the first texture
glBindTexture(GL_TEXTURE_2D, texture[0]) #ふたつ目のテクスチャを使う secont texture
#図形描画 #ふたつ目のテクスチャ instance object with the second texture

GL_EYE_LINEAR

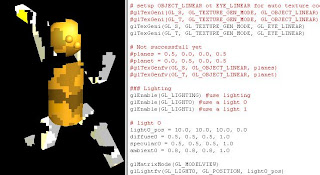
テクスチャー座標自動生成には2つのオプションがあります。GL_EYE_LINEARをセットすると、テクスチャーの位置がカメラに固定されます。図形が動くと模様が変わります。例えば、スライド上映中にスクリーンの前を横切った人のようなものです。あるいは、通り過ぎる鏡面仕上げの車に映るあなたの姿のようなものです。ただあまり大きなテクスチャーは大きな負荷になるそうですので、用途は限られそうです。
glTexGeni(GL_S, GL_TEXTURE_GEN_MODE, GL_EYE_LINEAR)
glTexGeni(GL_T, GL_TEXTURE_GEN_MODE, GL_EYE_LINEAR)

一方、GL_OBJECT_LINEARを指定すると、図形と一緒に模様が動きます。テクスチャー柄の洋服を着た人が動き回るようなものです。これは普通にテクスチャですね。
glTexGeni(GL_S, GL_TEXTURE_GEN_MODE, GL_OBJECT_LINEAR)
glTexGeni(GL_T, GL_TEXTURE_GEN_MODE, GL_OBJECT_LINEAR)

Automatic texture coordinate generation has two options. GL_EYE_LINEAR fixes relative position of texture and camera. This is something like you walk across a projection screen during slide show.
glTexGeni(GL_S, GL_TEXTURE_GEN_MODE, GL_EYE_LINEAR)
glTexGeni(GL_T, GL_TEXTURE_GEN_MODE, GL_EYE_LINEAR)

GL_OBJECT_LINEAR fixed texture potition to the object. When object moves, texture moves as a skin of the object.
glTexGeni(GL_S, GL_TEXTURE_GEN_MODE, GL_OBJECT_LINEAR)
glTexGeni(GL_T, GL_TEXTURE_GEN_MODE, GL_OBJECT_LINEAR)

現時点でのソースコード:

import sys
import math
import Image
from OpenGL.GL import *
from OpenGL.GLU import *
from OpenGL.GLUT import *

TORSO_RADIUS=0.1
TORSO_HEIGHT=0.4

HEAD_RADIUS = 0.1

UPPER_ARM_HEIGHT=0.2
UPPER_ARM_WIDTH=0.07

LOWER_ARM_HEIGHT=0.2
LOWER_ARM_WIDTH=0.05

UPPER_LEG_HEIGHT=0.2
UPPER_LEG_WIDTH=0.08

LOWER_LEG_HEIGHT=0.2
LOWER_LEG_WIDTH=0.06

SHOLDER_WIDTH = 0.2
HIP_WIDTH = 0.2

HEADX=0.1
HEADY=TORSO_HEIGHT

LUAX=-1.0 * SHOLDER_WIDTH / 2
RUAX=SHOLDER_WIDTH / 2
LUAY=RUAY=TORSO_HEIGHT
LLAY=RLAY=LOWER_ARM_HEIGHT

LULX=-1.0 * HIP_WIDTH / 2
RULX=HIP_WIDTH / 2
LULY=RULY=0
LLLY=RLLY=LOWER_LEG_HEIGHT

t0=0.0
t1=0.0
t2=0.0
t3=90.0
t4=0.0
t5=90.0
t6=0.0
t7=180.0
t8=0.0
t9=180.0
t10=0.0

def display():
glClear(GL_COLOR_BUFFER_BIT | GL_DEPTH_BUFFER_BIT)

glMatrixMode(GL_PROJECTION)
glLoadIdentity()

# set camera FOV=20 degree, aspect=1.0, near=1.0(0.0 will cause error), far=100.9
gluPerspective(20, 1.0, 1.0, 100.0)

glMatrixMode(GL_MODELVIEW)
glLoadIdentity()
# Place camera at (2,2,2), to direction (0, 0.2, 0), rotation around Z axis 0 degree(up Y)
gluLookAt(2.0, 2.0, 2.0, 0.0, 0.2, 0.0, 0.0, 1.0, 0.0)

#TORSO
#glDisable(GL_TEXTURE_2D)
gray()
materials(brass_amb, brass_diff, brass_spec, brass_shin)
glRotatef(t0, 0.0, 1.0, 0.0)
torso()
glPushMatrix()

#HEAD
cyan()
glTranslatef(0.0, HEADX, 0.0)
glRotatef(t1, 1.0, 0.0, 0.0)
glRotatef(t2, 0.0, 1.0, 0.0)
glTranslatef(0.0, HEADY, 0.0)
head()

#nose
yellow()
glTranslatef(0.0, 0.0, HEAD_RADIUS)
#glRotatef(0, 1.0, 0.0, 0.0)
nose()

#eyes
magenta()
glTranslatef(HEAD_RADIUS/2, HEAD_RADIUS/2, 0.0)
#glRotatef(0, 1.0, 0.0, 0.0)
nose()

glTranslatef(-HEAD_RADIUS, 0.0, 0.0)
#glRotatef(0, 1.0, 0.0, 0.0)
nose()

#LEFT UPPER ARM
glEnable(GL_TEXTURE_2D)
glPopMatrix()
glPushMatrix()
red()
glTranslatef(LUAX, LUAY, 0.0)
glRotatef(t3, 1.0, 0.0, 0.0)
upper_arm()

#LEFT LOWER ARM
green()
glTranslatef(0.0, LLAY, 0.0)
glRotatef(t4, 1.0, 0.0, 0.0)
lower_arm()

#RIGHT UPPER ARM
glPopMatrix()
glPushMatrix()
blue()
glTranslatef(RUAX, RUAY, 0.0)
glRotatef(t5, 1.0, 0.0, 0.0)
upper_arm()

#RIGHT UPPER ARM
cyan()
glTranslatef(0.0, RLAY, 0.0)
glRotatef(t6, 1.0, 0.0, 0.0)
lower_arm()

#LEFT UPPER LEG
glPopMatrix()
glPushMatrix()
magenta()
glTranslatef(LULX, LULY, 0.0)
glRotatef(t7, 1.0, 0.0, 0.0)
upper_leg()

#LEFT LOWER LEG
yellow()
glTranslatef(0.0, LLLY, 0.0)
glRotatef(t8, 1.0, 0.0, 0.0)
lower_leg()

#RIGHT UPPER LEG
glPopMatrix()
glPushMatrix()
pink()
glTranslatef(RULX, RULY, 0.0)
glRotatef(t9, 1.0, 0.0, 0.0)
upper_leg()

#RIGHT LOWER LEG
gray()
glTranslatef(0.0, RLLY, 0.0)
glRotatef(t10, 1.0, 0.0, 0.0)
lower_leg()

glPopMatrix()
#glutSwapBuffers()
glFlush()

def torso():
glPushMatrix()
glRotatef(-90.0, 1.0, 0.0, 0.0)
gluCylinder(p, TORSO_RADIUS, TORSO_RADIUS, TORSO_HEIGHT, 10, 10)
glPopMatrix()

def head():
glPushMatrix()
glRotatef(-90.0, 1.0, 0.0, 0.0)
glutSolidSphere(HEAD_RADIUS, 10, 10)
glPopMatrix()

def upper_arm():
glPushMatrix()
glTranslatef(0.0, 0.5*UPPER_ARM_HEIGHT, 0.0)
glScalef(UPPER_ARM_WIDTH, UPPER_ARM_HEIGHT, UPPER_ARM_WIDTH)
glutSolidCube(1.0)
glPopMatrix()

def lower_arm():
glPushMatrix()
glTranslatef(0.0, 0.5*UPPER_ARM_HEIGHT, 0.0)
glScalef(LOWER_ARM_WIDTH, LOWER_ARM_HEIGHT, LOWER_ARM_WIDTH)
glutSolidCube(1.0)
glPopMatrix()

def upper_leg():
glPushMatrix()
glTranslatef(0.0, 0.5*LOWER_ARM_HEIGHT, 0.0)
glScalef(UPPER_LEG_WIDTH, UPPER_LEG_HEIGHT, UPPER_LEG_WIDTH)
glutSolidCube(1.0)
glPopMatrix()

def lower_leg():
glPushMatrix()
glTranslatef(0.0, 0.5*LOWER_ARM_HEIGHT, 0.0)
glScalef(LOWER_LEG_WIDTH, LOWER_LEG_HEIGHT, LOWER_LEG_WIDTH)
glutSolidCube(1.0)
glPopMatrix()

def nose():
glPushMatrix()
glRotatef(-90.0, 1.0, 0.0, 0.0)
glutSolidSphere(HEAD_RADIUS/5, 10, 10)
glPopMatrix()

def red():
glColor3f(1.0, 0.0, 0.0)
def green():
glColor3f(0.0, 1.0, 0.0)
def blue():
glColor3f(0.0, 0.0, 1.0)
def cyan():
glColor3f(0.0, 1.0, 1.0)
def magenta():
glColor3f(1.0, 1.0, 0.0)
def yellow():
glColor3f(1.0, 0.0, 1.0)
def pink():
glColor3f(1.0, 0.5, 0.5)
def gray():
glColor3f(0.7, 0.7, 0.7)

def mykey(key, x, y):
global t0, t1, t2, t3, t4, t5, t6, t7, t8, t9, t10
if key=='d': # TORSO
t0 = t0 + 10.0
elif key=='D':
t0 = t0 - 10.0
elif key=='e': # HEAD 1
t1 = t1 + 10.0
elif key=='E':
t1 = t1 - 10.0
elif key=='r': # HEAD 2
t2 = t2 + 10.0
elif key=='R':
t2 = t2 - 10.0
elif key=='s': # LUA
t3 = t3 + 10.0
elif key=='S':
t3 = t3 - 10.0
elif key=='a': # LLA
t4 = t4 + 10.0
elif key=='A':
t4 = t4 - 10.0
elif key=='f': # RUA
t5 = t5 + 10.0
elif key=='F':
t5 = t5 - 10.0
elif key=='g': # RLA
t6 = t6 + 10.0
elif key=='G':
t6 = t6 -10.0
elif key=='x': # LUL
t7 = t7 + 10.0
elif key=='X':
t7 = t7 - 10.0
elif key=='z': # LLL
t8 = t8 + 10.0
elif key=='Z':
t8 = t8 -10.0
elif key=='c': # RUL
t9 = t9 + 10.0
elif key=='C':
t9 = t9 - 10.0
elif key=='v': # RLL
t10 = t10 + 10.0
elif key=='V':
t10 = t10 - 10.0
elif key=='q':
sys.exit()
elif key=='Q':
sys.exit()

print "params: ", t0, t1, t2, t3, t4, t5, t6, t7, t8, t9, t10
glutPostRedisplay()

def materials(amb, diff, spec, shin):
glMaterialfv(GL_FRONT_AND_BACK, GL_AMBIENT, amb)
glMaterialfv(GL_FRONT_AND_BACK, GL_DIFFUSE, diff)
glMaterialfv(GL_FRONT_AND_BACK, GL_SPECULAR, spec)
glMaterialfv(GL_FRONT_AND_BACK, GL_SHININESS, shin)

glutInit( sys.argv )
#glutInitDisplayMode( GLUT_RGBA | GLUT_DOUBLE | GLUT_DEPTH )
glutInitDisplayMode( GLUT_RGBA | GLUT_SINGLE | GLUT_DEPTH )
glutInitWindowSize( 500, 500 )
glutInitWindowPosition(0,0)
glutCreateWindow( 'robot' )
glutDisplayFunc( display )
glutKeyboardFunc(mykey)

glEnable(GL_DEPTH_TEST) #hidden-usrface removal
glEnable(GL_CULL_FACE) #don't draw back side surface
glCullFace(GL_BACK) #don't draw back side surface

### TEXTURE
glEnable(GL_TEXTURE_2D)
# generate continuous one texture
# different format from C, void glGenTexture(n, *name)
texture=glGenTextures(1)

# use the generated texture
glBindTexture(GL_TEXTURE_2D, texture)

# read texture data from .bmp file ising Image library
image=Image.open("ksmt.bmp")
if len(image.getbands())!=4:
image=image.convert("RGBA")
size=image.size

# generate texture from array image.tostring() inside current texture 'texture'
glTexImage2D(GL_TEXTURE_2D, 0, GL_RGBA, size[0], size[1], 0, GL_RGBA, GL_UNSIGNED_BYTE, image.tostring())

# set texture options, repeat same pattern
glTexParameterf(GL_TEXTURE_2D, GL_TEXTURE_WRAP_S, GL_REPEAT)
glTexParameterf(GL_TEXTURE_2D, GL_TEXTURE_WRAP_T, GL_REPEAT)

# set texture options, enlarge and shrink
glTexParameterf(GL_TEXTURE_2D, GL_TEXTURE_MAG_FILTER, GL_NEAREST)
glTexParameterf(GL_TEXTURE_2D, GL_TEXTURE_MIN_FILTER, GL_NEAREST)

# set texture options, slow but good image
glHint(GL_PERSPECTIVE_CORRECTION_HINT, GL_NICEST)

# enable auto generation of texture coordinate in s and t direction
glEnable(GL_TEXTURE_GEN_S)
glEnable(GL_TEXTURE_GEN_T)

# setup OBJECT_LINEAR ot EYE_LINEAR for auto texture coord generation
#glTexGeni(GL_S, GL_TEXTURE_GEN_MODE, GL_OBJECT_LINEAR)
#glTexGeni(GL_T, GL_TEXTURE_GEN_MODE, GL_OBJECT_LINEAR)
glTexGeni(GL_S, GL_TEXTURE_GEN_MODE, GL_EYE_LINEAR)
glTexGeni(GL_T, GL_TEXTURE_GEN_MODE, GL_EYE_LINEAR)

# Not successfull yet
#planes = 0.5, 0.0, 0.0, 0.5
#planet = 0.0, 0.5, 0.0, 0.5
#glTexGenfv(GL_S, GL_OBJECT_LINEAR, planes)
#glTexGenfv(GL_T, GL_OBJECT_LINEAR, planet)

### Lighting
glEnable(GL_LIGHTING) #use lighting
glEnable(GL_LIGHT0) #use a light 0
glEnable(GL_LIGHT1) #use a light 1

# light 0
light0_pos = 10.0, 10.0, 10.0, 0.0
diffuse0 = 0.5, 0.5, 0.5, 1.0
specular0 = 0.5, 0.5, 0.5, 1.0
ambient0 = 0.8, 0.8, 0.8, 1.0

glMatrixMode(GL_MODELVIEW)
glLightfv(GL_LIGHT0, GL_POSITION, light0_pos)
glLightfv(GL_LIGHT0, GL_DIFFUSE, diffuse0)
glLightfv(GL_LIGHT0, GL_SPECULAR, specular0)
glLightfv(GL_LIGHT0, GL_AMBIENT, ambient0)

# light 1
light1_pos = 0.0, 0.0, 10.0, 0.0
diffuse1 = 0.8, 0.8, 0.8, 1.0
specular1 = 0.2, 0.2, 0.2, 1.0
ambient1 = 0.2, 0.2, 0.2, 1.0

glLightfv(GL_LIGHT1, GL_POSITION, light1_pos)
glLightfv(GL_LIGHT1, GL_DIFFUSE, diffuse1)
glLightfv(GL_LIGHT1, GL_SPECULAR, specular1)
glLightfv(GL_LIGHT1, GL_AMBIENT, ambient1)

# Material
brass_amb = 0.33, 0.22, 0.03, 1.0
brass_diff = 0.78, 0.57, 0.11, 1.0
brass_spec = 0.99, 0.91, 0.81, 1.0
brass_shin = 27.8

p_amb = 0.3, 0.0, 0.0, 1.0
p_diff = 0.6, 0.0, 0.0, 1.0
p_spec = 0.8, 0.6, 0.6, 1.0
p_shin = 32.8

# create new Quadric 'p' for gluCylinder and set texture for it
p=gluNewQuadric()
gluQuadricDrawStyle(p, GLU_FILL)
gluQuadricNormals(p, GLU_SMOOTH)
#gluQuadricTexture(p, GL_TRUE)

glutMainLoop()

TEXTURE is difficult to understand

まったくテクスチャマッピングというのはさっぱり分かりません。入門書の内容が急に難解になり、分かりやすいサンプルがついていません。特にgluあるいはglutオブジェクトにどうやってテクスチャを貼るのかが分かりません。本に書いてあるようなのですが、例がないので理解できないのです。また、Webをいくら探してもPythonでglutソリッドモデルにテクスチャを貼った例が見つからないのです。全部glTexCoord2fでポリゴンにマップしています。
で、まる1日四苦八苦して、やっとなんとかテクスチャが貼れるようになったのですが、相変わらず理解できません。絵もコードもぐちゃぐちゃです。でも、まあ絵がでただけましで、これで前に進めると思います。

I cannot understand Texture Mapping yet. It's really complex and difficult to understand. I cannot find good example in books nor web. Most examples use glTexCoord2f. This is good for polygons, but not good for glu and glut solid models I'm using today.

After a whole day struggling on Texture, I finally can see something on screen. But, I still don't understand what happening. I can probably go further by looking at the pictures.

Followings are my findings yesterday and today on Texture Mapping.

1. Image library is usefull for reading Texture from graphic files. Install Image library from http://www.pythonware.com/products/pil/ on Python and "import Image".

2. Read a .bmp file into a matrix and specify the matrix as Texture.

image=Image.open("ksmt.bmp")
if len(image.getbands())!=4:
image=image.convert("RGBA")
size=image.size
# generate texture
glTexImage2D(GL_TEXTURE_2D, 0, GL_RGBA, size[0], size[1], 0, GL_RGBA, GL_UNSIGNED_BYTE, image.tostring())

3. Enable using 2D texture
glEnable(GL_TEXTURE_2D)

4. Enable? texture for gluQuadric object

p=gluNewQuadric()
gluQuadricDrawStyle(p, GLU_FILL)
gluQuadricNormals(p, GLU_SMOOTH)
gluQuadricTexture(p, GL_TRUE)

5. Enable auto texture coordinate generation

glEnable(GL_TEXTURE_GEN_S)
glEnable(GL_TEXTURE_GEN_T)
glTexGeni(GL_S, GL_TEXTURE_GEN_MODE, GL_OBJECT_LINEAR)
glTexGeni(GL_T, GL_TEXTURE_GEN_MODE, GL_OBJECT_LINEAR)

Something wrong in using glTexGenfv. I need to understand this
planes = 0.5, 0.0, 0.0, 0.5
planet = 0.0, 0.5, 0.0, 0.5
#glTexGenfv(GL_S, GL_OBJECT_LINEAR, planes)
#glTexGenfv(GL_T, GL_OBJECT_LINEAR, planet)